

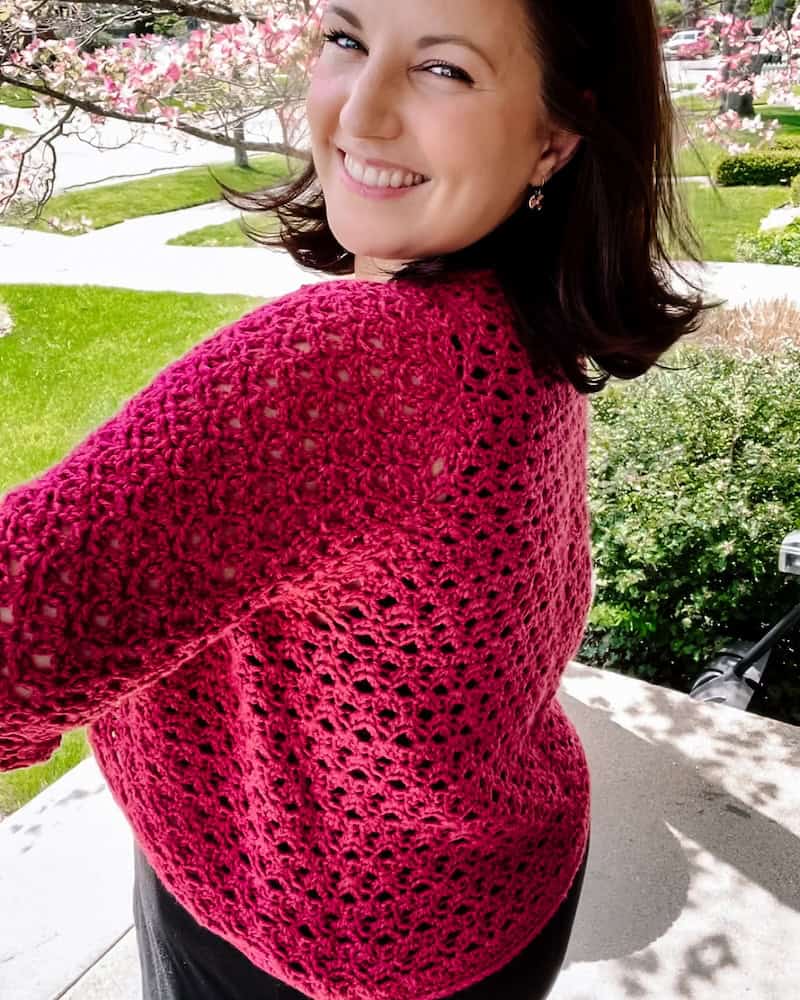
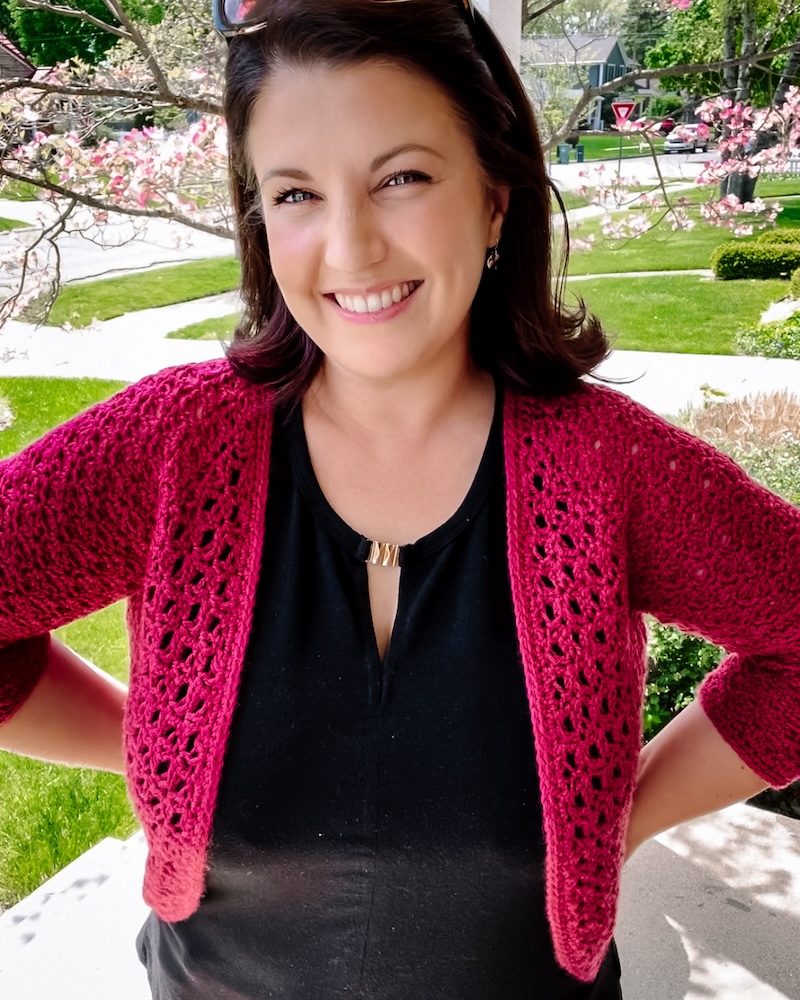
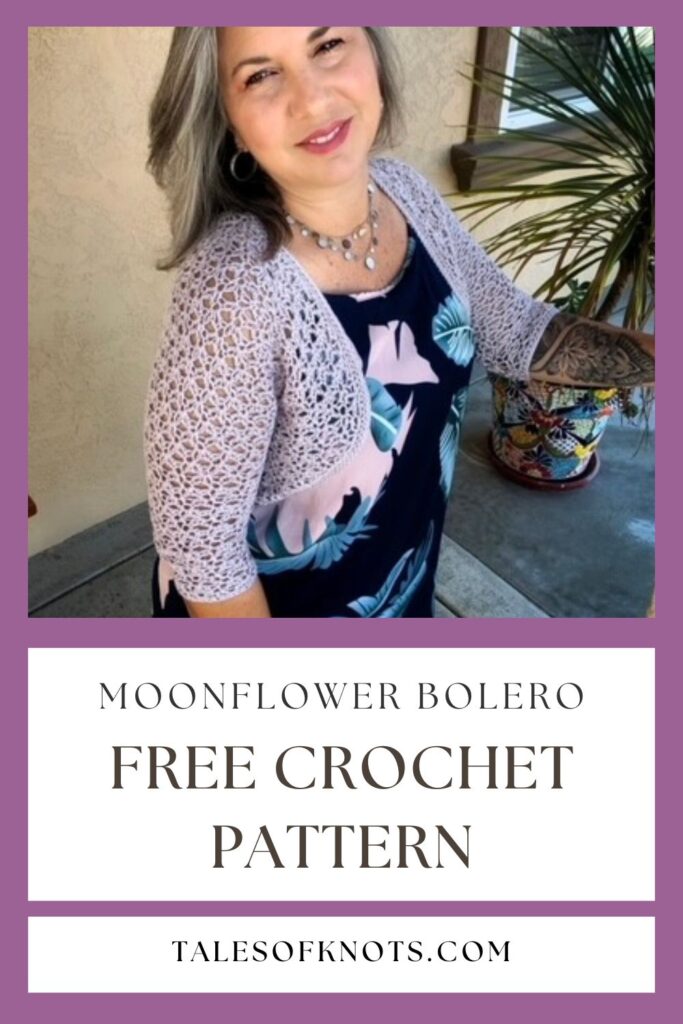
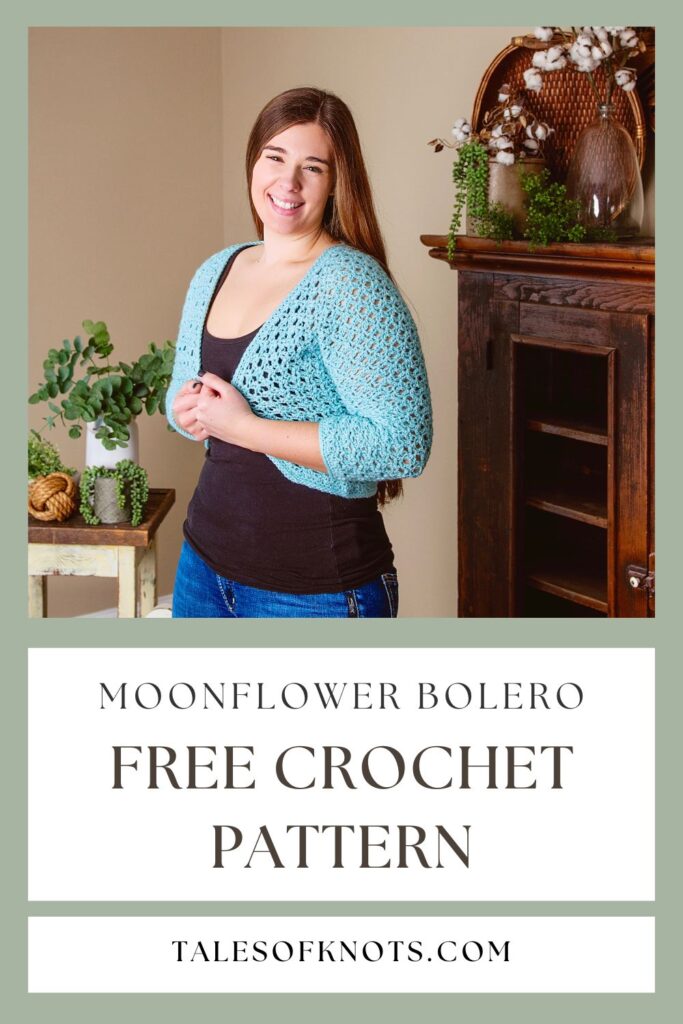
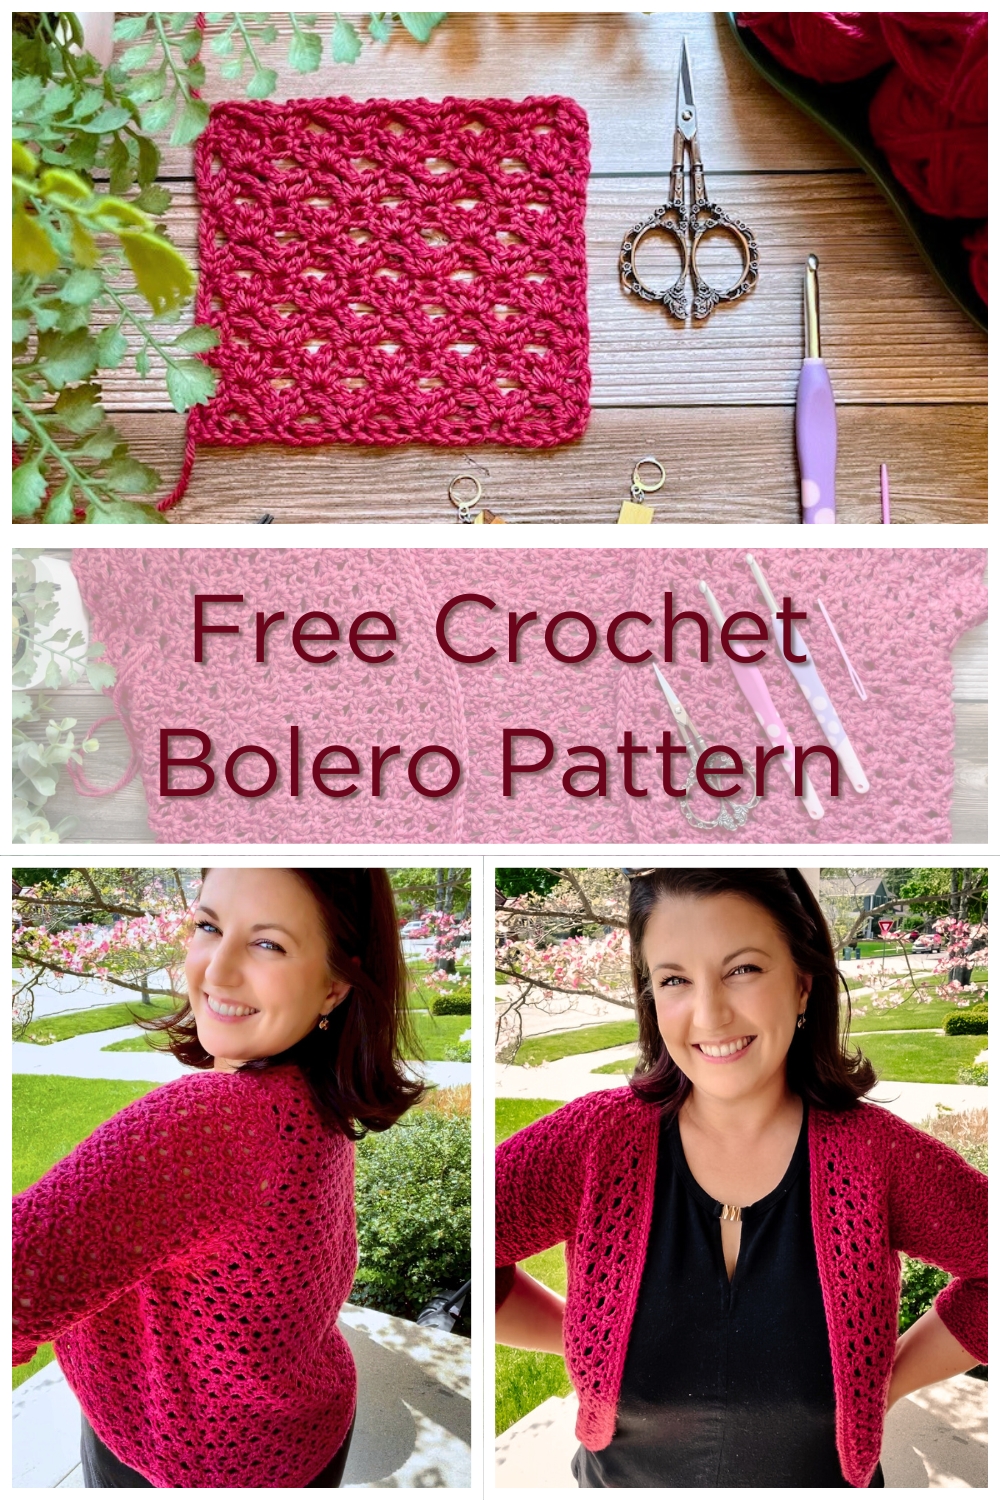
Moonflower Crochet Bolero Free Pattern – Lacy Cropped Shrug
This beautiful, lacy, cropped crochet cardigan pattern is perfect for intermediate crocheters looking to expand their skill set and results in a well-fitting and stylish addition to your wardrobe. And I’m thrilled to share this free crochet bolero pattern with you here on the blog!
*Disclosure: This post contains affiliate links to support the running of this blog, and at no additional cost to you, I may earn a commission if you decide to make a purchase after clicking through the link. Please see my Privacy Policy for full details. Thank you for supporting Tales of Knots!
The Design
‘Completer’ garments should be foundational pieces in everyone’s wardrobe, and this crochet bolero is the perfect layering item for Spring to complete any outfit. The ¾ length sleeves and fitted Raglan silhouette make this elegant shrug suitable for almost any occasion, while the open, lacy texture drapes comfortably around your curves and keeps the look fun and fresh for more casual outings.
The pattern comes in a range of sizes from XS to 5X, with a full video walkthrough (coming soon!) to help you every step of the way. Whether you make this crochet bolero in neutral tones as a simple cover up, or bright neons as an eye-catching statement piece; you’ll want to make this deceptively quick make in all the colors!

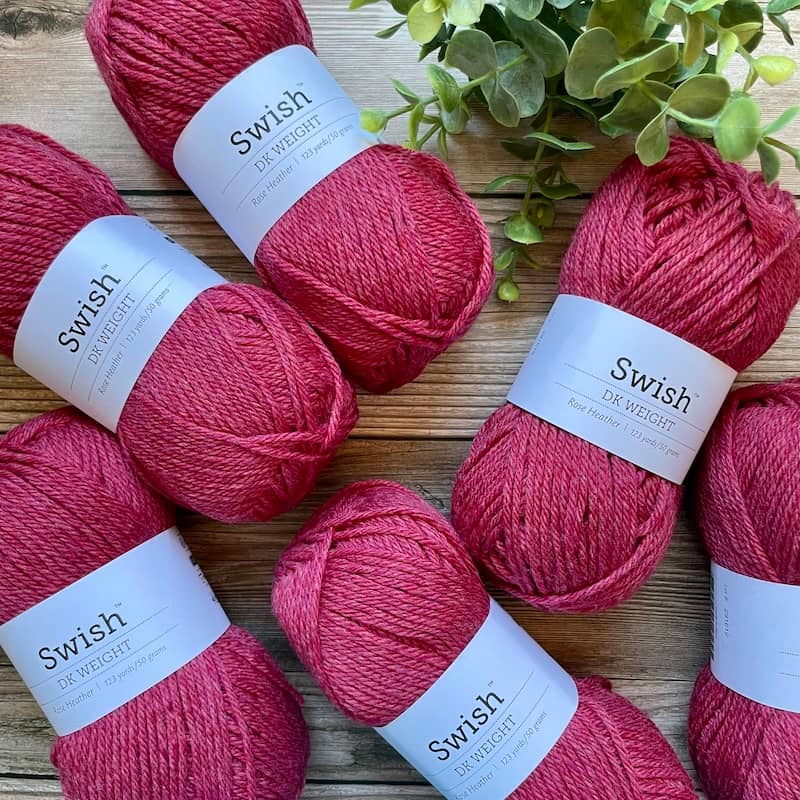
The Yarn
Both samples of the crochet bolero featured here are made with Swish DK yarn from We Crochet. The mint sample is called Wonderland Heather, and the pink sample is called Rose Heather.
The yarn is 100% Superwash Merino Wool, and comes in 50g bullet skeins of 123 yards each. Ideal for Spring garments to give you a little extra warmth against the chill, the yarn is still lightweight and incredibly soft.
The tight ply gives fabulous stitch definition and doesn’t split easily, and is even machine washable and dryer friendly. Available in 42 gorgeous solid or heathered colors, this is the perfect go-to yarn for garments of all kinds.
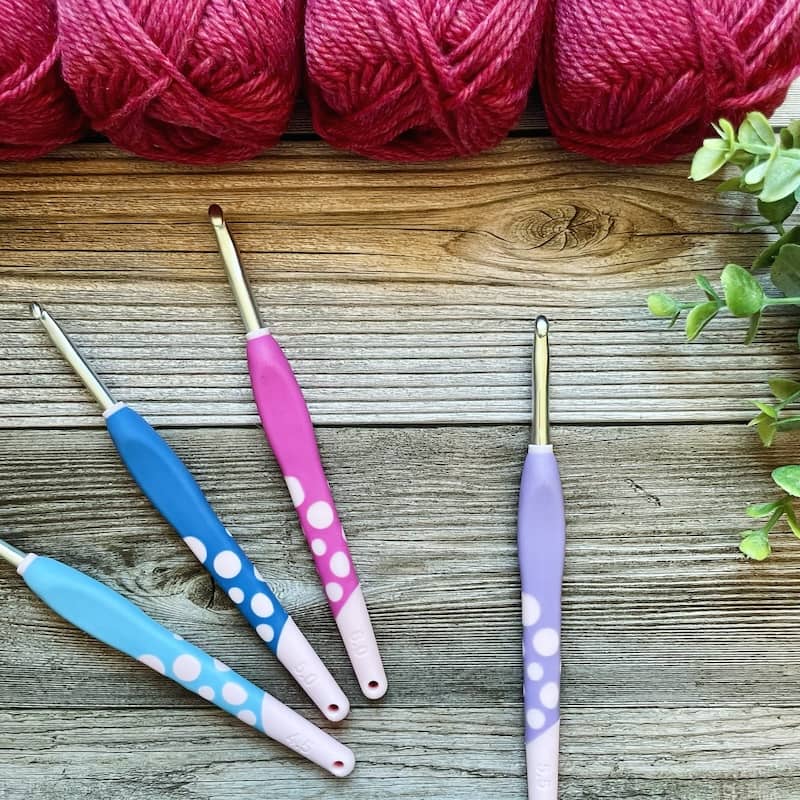
The Hook
Recently I managed to purchase a set of We Crochet Dots hooks when they were first released, (before they immediately sold out! Don’t worry, they’re back in stock now) and they are my current favorites to use no matter the project!
They come in 9 sizes from 2mm to 6mm, and feature a tapered-style aluminum shaft. The ergonomic rubberized grips are comfortable to work with, lightweight to use, and the size is clearly labelled on each hook.
There’s even a hole in the end of each handle to clip a locking stitch marker to, so that you never lose your place marker when crocheting on the go! These hooks are incredibly well designed and thought out, and the price point is honestly incredible. At $29.99 for a full set, you can’t go wrong.
Moonflower Crochet Bolero Supplies and Info
Yarn:
- DK light worsted (size 3) We Crochet Swish yarn.
Sizes:
- XS (S, M, L, XL) (2X, 3X, 4X, 5X)
Yardage:
- 430 (480, 590, 750, 900) (1150, 1340, 1660, 1760) yds
Crochet Hook:
- 5.5 mm (US I-9) We Crochet Dots hook, or size needed to obtain gauge.
Notions:
Skill Level:
- Intermediate, designed to expand your crochet skills. The pattern assumes familiarity with basic crochet stitches as well as various single and double crochet stitch decreases, and working over row ends. – Need help? Join the Tales of Knots Facebook Group to ask any questions!
Gauge: 4×4 in / 10×10 cm
- 3.25 ‘triangle’ st repeats x 7 rows in pattern repeat, blocked. See gauge swatch instructions below for full details on how to measure this.
Abbreviations (US crochet terms):
- BLO = back loop only
- ch(s) = chain(s)
- dc = double crochet
- dc2(3)(4)tog = double crochet 2 (3) (4) stitches together – see Special Stitches below
- dec = decrease
- fsc = foundation single crochet – see Special Stitches below
- hdc = half double crochet
- inc = increase
- RS = right side
- sc = single crochet
- sc2tog = single crochet 2 stitches together
- sk = skip
- sl st = slip stitch
- st(s) = stitch(es)
- WS = wrong side
- yo = yarn over
Special Stitches
Double Crochet 3 Together (dc3tog): yo, insert hook in first indicated st, yo, pull up loop, yo, pull through 2 loops, [yo, insert hook in next indicated st, yo, pull up loop, yo, pull through 2 loops] twice, yo, pull through all loops on hook. (Worked over 2 sts; the 2nd and 3rd dc sections are worked in the same st.
Double Crochet 4 Together (dc4tog): yo, insert hook in first indicated st, yo, pull up loop, yo, pull through 2 loops, yo, insert hook in next indicated st, yo, pull up loop, yo, pull through 2 loops, [yo, insert hook in last indicated st, yo, pull up loop, yo, pull through 2 loops] twice, yo, pull through all loops on hook. (Worked over 3 sts; the 3rd and 4th dc sections are worked in the same st.)
Foundation Single Crochet (fsc): ch 2, insert hook in second ch from hook, yo, pull up loop, yo, pull through 1 loop (ch made), yo, pull through 2 loops (sc made), *insert hook in ch of previous st, yo, pull up loop, yo, pull through 1 loop (ch made), yo, pull through 2 loops (sc made); repeat from * until required number of fsc have been made.
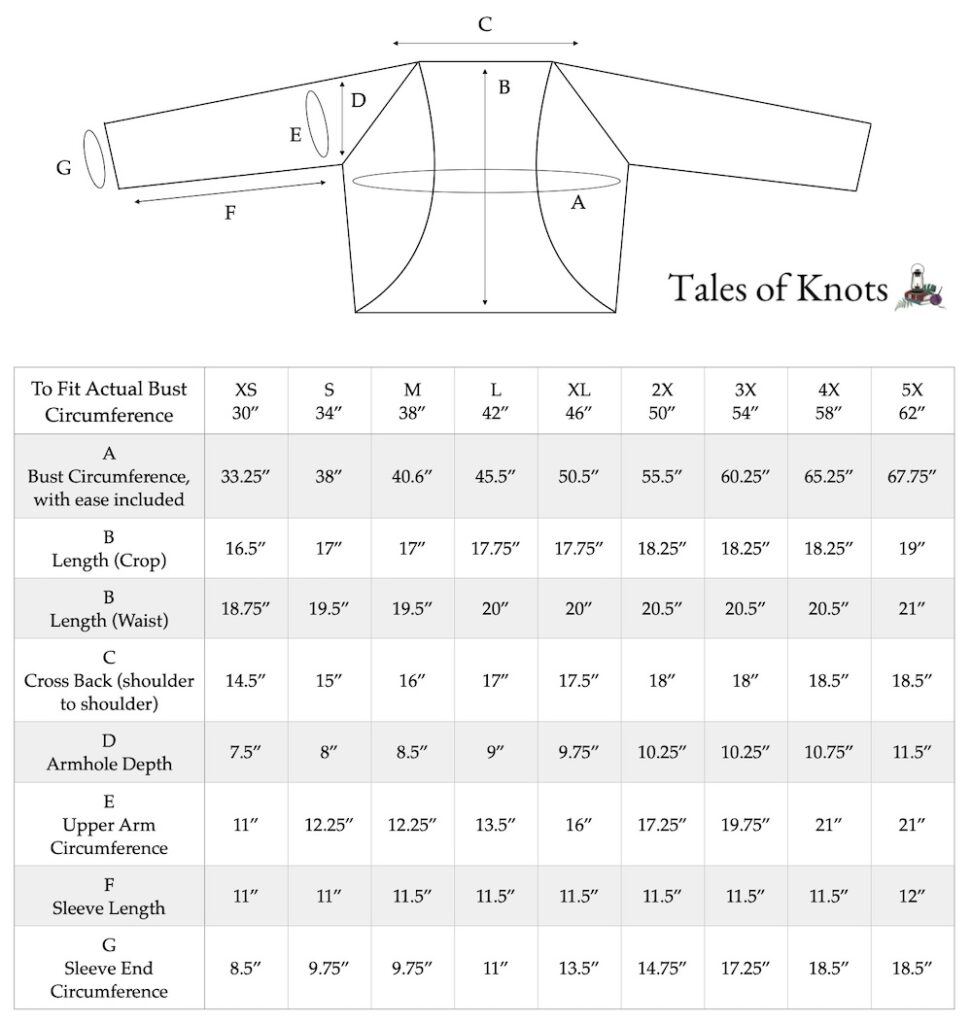
Moonflower Bolero Finished Measurements
The Moonflower Crochet Bolero comes in 9 sizes with approx. 3-7″ positive ease designed in at the bust, and the sizing directions are written as follows: XS (S, M, L, XL) (2X, 3X, 4X 5X).
Choose your preferred size from the schematic and finished measurement table below. As this pattern is not designed to close over your bust, use the finished bust measurement as a starting point but ensure that the C: cross back (shoulder to shoulder) measurement and E: upper arm circumference are a good fit. It’s important to note that Craft Yarn Council sizes are based on a B-cup bra size; if you have a larger bust and narrower shoulders, you may wish to size down for a closer fit around the back, shoulders and arms, and then follow the directions for the included bust shaping.
Schematic
Want further guidance on choosing the correct size, along with a full page of customizations, a stitch chart and a style guide?
Just click the button below to view the complete premium pattern PDF in my shops.

Gauge Swatch
Pattern Repeat: *Ch 2, dc2tog over (same st and next dc2tog), ch 2, sc in same st*
1 ‘triangle’ is measured as 1 pattern repeat, i.e. the distance between sc sts.
1/2 triangle is measured from the top of 1 dc2tog to the sc either before or after.
As our blocked gauge is 3.25 triangle stitch repeats, this means that it includes the next ch-2 after the last full ‘triangle’ measured.
Row 1:
Fsc 21, turn.
Row 2:
Ch 1 (does not count as a st), sc in first fsc, *ch 2, dc2tog over (same fsc, sk 3 fsc, next fsc), ch 2, sc in same fsc; repeat from * across up to and including last fsc, turn.
5 triangles
Row 3:
Ch 3, dc in first dc2tog, (together the ch-3 and dc count as a dc2tog) ch 2, sc in same dc2tog, *ch 2, dc2tog over (same dc2tog and next dc2tog, skipping all sts in between), ch 2, sc in same dc2tog; repeat from * across up to and including last dc2tog, ch 2, dc2tog over (same dc2tog and sc of previous row), turn.
4 triangles, 2 half triangles (1 on each outer edge)
Row 4:
Ch 1, sc in first dc2tog, *ch 2, dc2tog over (same dc2tog and next dc2tog), ch 2, sc in same dc2tog; repeat from * across, placing last leg of dc2tog and sc in top of turning ch-3 from previous row, turn.
5 triangles
Rows 5-10:
Repeat Rows 3-4.
Fasten off, block gauge swatch. Measure your gauge over ‘triangle’ sts and rows in the middle of this swatch.
Moonflower Bolero Pattern Notes
The crochet bolero pattern is worked top down, beginning at the neckline and yoke, working only 3 sides of a raglan; the first sleeve, back, and second sleeve. The pattern is then split for the sleeves with a row that works from the neckline and down the front row ends of one side, skips the first sleeve stitches, works across the back, skips the opposite sleeve stitches, and finally up the front row ends of the opposite side back up to the neckline.
The Body is then continued in rows from the front neckline edge all the way around the back to the opposite front edge, with trim and Sleeves added last.
Chain 1 at the beginning of a row does not count as a stitch.
Chain 5 counts as a ‘dc, ch-2’ and chain 3 counts as a dc, as noted in pattern.
Where row instructions do not apply to a particular size, corresponding size stitch counts will show a dash -.
Instruction to work in ‘same st’ refers to working again in the previous stitch used. Within the triangle stitch pattern the last leg of a dc2tog, sc, and first leg of the next dc2tog are all worked into the same stitch.
Instructions following an asterisk * are repeated across a section.
Instructions between brackets [ ] are worked the total number of times specified.
Moonflower Bolero Full Video Tutorials
Video 1: The Gauge Swatch
Video 2: The Yoke
Video 3: The Body
Video 4: The Trim
Video 5: The Sleeves
Moonflower Bolero Pattern Directions
Rows 4 – 5:
Repeat Row 3.
19 (20, 20, 21, 22) (23, 23, 24, 24) triangles, with half triangle inc on each outer edge.
Sizes XS (S, M, L, -) (-, -, -, -) only:
Row 6(a):
Ch 5, sc in first st, *ch 2, dc2tog over (same st and next dc2tog), ch 2, sc in same st; repeat from * up to and including last st, placing last leg of dc2tog and sc in 3rd ch, ch 2, dc in same 3rd ch, turn (sk over the marked sts).
20 (21, 21, 22, -) (-, -, -, -) triangles, with half triangle inc on each outer edge (inc of 1 triangle).
No internal sleeve inc, move sleeve markers up to the dc2tog worked over the marked sc.
Row 7(a):
Repeat Row 6(a).
21 (22, 22, 23, -) (-, -, -, -) triangles, with half triangle inc on each outer edge (inc of 1 triangle).
No internal sleeve inc, move sleeve markers up to the sc worked into the marked dc2tog.
Sizes – (-, -, -, XL) (2X, 3X, 4X, 5X) only:
Rows 6(b) – 7(b):
Repeat Row 3.
– (-, -, -, 28) (29, 29, 30, 30) triangles, with half triangle inc on each outer edge.
All Sizes:
Row 8:
Repeat Row 3.
24 (25, 25, 26, 31) (32, 32, 33, 33) triangles, with half triangle inc on each outer edge.
Sizes – (-, -, -, XL) (2X, -, -, -) only:
Rows 9(a) – 10(a):
Repeat Rows 6(a) – 7(a).
– (-, -, -, 33) (34, -, -, -) triangles, with half triangle inc on each outer edge.
Sizes XS (S, M, L, -) (-, 3X, 4X, 5X) only:
Rows 9(b) – 10(b):
Repeat Row 3.
30 (31, 31, 32, -) (-, 38, 39, 39) triangles, with half triangle inc on each outer edge.
Sizes XS (S, M, L, -) (-, -, -, -) only:
Rows 11(a) – 12(a):
Repeat Rows 6(a) – 7(a).
32 (33, 33, 34, -) (-, -, -, -) triangles, with half triangle inc on each outer edge.
Sizes – (-, -, -, XL) (2X, -, -, -) only:
Rows 11(b) – 12(b):
Repeat Row 3.
– (-, -, -, 39) (40, -, -, -) triangles, with half triangle inc on each outer edge.
Sizes – (-, -, -, -) (-, 3X, 4X, 5X) only:
Row 11(c):
Ch 1 (does not count as a st), sc in first st, [*ch 2, dc2tog over (same st and next dc2tog), ch 2, sc in same st;* repeat from * to * up to and including dc2tog before marked st, ch 2, dc2tog over (same st and marked st), ch 2, sc in marked st (move marker up), ch 2, dc2tog over (same st and next dc2tog), ch 2, sc in same st] twice, repeat from * to * up to and including last st, placing last leg of dc2tog and sc in 3rd ch of turning ch, turn.
– (-, -, -, -) (-, 41, 42, 42) triangles (inc of 3 triangles).
No outer edge inc.
Row 12(c):
Ch 3 (counts as dc), dc in first dc2tog, ch 2, sc in same st, [*ch 2, dc2tog over (same st and next dc2tog), ch 2, sc in same st;* repeat from * to * up to and including dc2tog before marked st, ch 2, dc2tog over (same st and marked st), ch 2, sc in marked st (move marker up), ch 2, dc2tog over (same st and next dc2tog), ch 2, sc in same st] twice, repeat from * to * up to and including last dc2tog, ch 2, dc2tog over (same st and sc of previous row), turn.
– (-, -, -, -) (-, 42, 43, 43) triangles, 2 half triangles (inc of 1 triangle and 2 half triangles)
No outer edge inc.
All Sizes:
Row 13:
Repeat Row 3.
35 (36, 36, 37, 42) (43, 45, 46, 46) triangles, with half triangle inc on each outer edge.
Size XS only, proceed to End of Yoke Section
Sizes – (S, M, L, XL) (2X, 3X, 4X, 5X) only:
Row 14:
Repeat Row 3.
– (39, 39, 40, 45) (46, 48, 49, 49) triangles, with half triangle inc on each outer edge.
Size S only, proceed to End of Yoke Section
Sizes – (-, M, L, -) (-, -, -, -) only:
Row 15(a):
Repeat Row 3.
– (-, 42, 43, -) (-, -, -, -) triangles, with half triangle inc on each outer edge.
Size M only, proceed to End of Yoke Section
Size – (-, -, L, -) (-, -, -, -) only:
Row 16(a):
Repeat Row 3.
– (-, -, 46, -) (-, -, -, -) triangles, with half triangle inc on each outer edge.
Size L only, proceed to End of Yoke Section
Sizes – (-, -, -, XL) (2X, 3X, 4X, 5X) only:
Rows 15(b) – 16(b):
Repeat Rows 11(c) – 12(c).
– (-, -, -, 49) (50, 52, 53, 53) triangles.
Row 17:
Repeat Row 3.
– (-, -, -, 52) (53, 55, 56, 56) triangles, with half triangle inc on each outer edge.
Size XL only, proceed to End of Yoke Section
Sizes – (-, -, -, -) (2X, 3X, 4X, 5X) only:
Row 18:
Repeat Row 3.
– (-, -, -, -) (56, 58, 59, 59) triangles, with half triangle inc on each outer edge.
Sizes 2X and 3X only, proceed to End of Yoke Section
Sizes – (-, -, -, -) (-, -, 4X, 5X) only:
Row 19:
Repeat Row 3.
– (-, -, -, -) (-, -, 62, 62) triangles, with half triangle inc on each outer edge.
Size 4X only, proceed to End of Yoke Section
Size – (-, -, -, -) (-, -, -, 5X) only:
Row 20:
Repeat Row 3.
– (-, -, -, -) (-, -, -, 65) triangles, with half triangle inc on each outer edge.
End of Yoke – All Sizes:
Final Yoke Row:
Ch 1, sc in first st, *ch 2, dc2tog over (same st and next dc2tog), ch 2, sc in same st; repeat from * up to and including last st, placing last leg of dc2tog and sc in 3rd ch of turning ch-5.
36 (40, 43, 47, 53) (57, 59, 63, 66) triangles (inc of 1 triangle).
No internal sleeve inc, move sleeve markers up to the dc2tog worked over the marked sc, no outer edge inc.
Fasten off.
Body
The following row is started at the edge of the neckline, opposite the marked st, then worked along the row ends of the front raglan edge until we reach the last Yoke row worked, then join directly into the first sleeve marked st. (The skipped sts form the first sleeve).
The established pattern is worked across the back to the next sleeve marker, then joined directly to the last st of the row and worked along the row ends of the opposite front raglan edge, back to the neckline. (The skipped sts form the second sleeve).
To accurately describe st placement along the raglan edge row ends, ‘row end st’ refers to working into either the top of the dc or the 3rd ch of the turning ch-5; these will be slightly more open as other sts have already been worked into them. ‘Row end post’ refers to working around the dc post or ch-3 space at the edges of the Yoke rows.
Rejoin yarn near beginning slip knot, in side of first fsc at neck edge, RS facing. (Opposite side to marked fsc.)
Note: placements of the established st pattern are sometimes slightly different over raglan row ends.
Place a marker in first dc2tog of each row and move up every row to help with edge decreases.
Row 1 (RS): Working down first raglan edge away from neck
Ch 1, [sc in same row end st, ch 2, dc2tog over (same row end st, sk row end post, next row end st), ch 2, sc around next row end post, ch 2, dc2tog over (next row end st, sk row end post, next row end st), ch 2] a total of 3 (3, 3, 3, 3) (3, 2, 2, 2) times, [sc in same row end st, ch 2, dc2tog over (same row end st, sk row end post, next row end st), ch 2] a total of 3 (4, 5, 6, 6) (7, 9, 10, 11) times.
Rotate to work across back
Bring first marked sleeve st up behind your work, sc2tog over (same (last) row end st, sk sleeve sts, and marked dc2tog along back edge), *ch 2, dc2tog over (same st and next dc2tog), ch 2**, sc in same st;* repeat from * to *, finishing last repeat at ** in next marked sleeve st.
Rotate to work up second raglan edge towards neck
Bring last st of row up behind your work, sc2tog over (same marked st, sk sleeve sts, and first row end st), ch 2, dc2tog over (same row end st, sk row end post, next row end st), ch 2, [sc in same row end st, ch 2, dc2tog over (same row end st, sk row end post, next row end st), ch 2] a total of 2 (3, 4, 5, 5) (6, 8, 9, 10) times, [sc in same row end st, ch 2, dc2tog over (same row end st, sk row end post, next row end st), ch 2, sc around next row end post, ch 2, dc2tog over (next row end st, sk row end post, next row end st), ch 2] a total of 2 (2, 2, 2, 2) (2, 1, 1, 1) time(s), sc in same row end st, ch 2, dc2tog over (same row end st, sk row end post, next row end st), ch 2, sc around next row end post, ch 2, dc3tog over (next row end st, sk row end post, last row end (marked) st at neckline twice), turn.
Total stitch count: 31 (35, 38, 42, 44) (48, 50, 54, 57) triangles
Divided as follows for each section:
9 (10, 11, 12, 12) (13, 13, 14, 15) triangles per front side, 13 (15, 16, 18, 20) (22, 24, 26, 27) triangles across back
Row 2 (WS):
Ch 1, sc in first dc3tog, *ch 2, dc2tog over (same st and next dc2tog), ch 2, sc in same st; repeat from * until one dc2tog remains, ch 2, dc3tog over (same st and last dc2tog twice), turn (leave last sc unworked).
30 (34, 37, 41, 43) (47, 49, 53, 56) triangles (dec of 1 triangle).
If you wish to add bust shaping, it should be added during the following Body Row 2 repeats. Please see the notes below before the End of Body Section for further details.
Crop Length instructions below – For Waist Length, work as for Crop length, then add 4 additional Row 2 repeats before proceeding to End of Body Section.
Sizes – (-, -, -, -) (-, -, 4X, 5X) only:
Rows 3 – 10:
Repeat Row 2 of Body.
– (-, -, -, -) (-, -, 45, 48) triangles
Sizes – (-, -, -, XL) (2X, 3X, -, -) only:
Rows 3 – 11:
Repeat Row 2 of Body.
– (-, -, -, 34) (38, 40, -, -) triangles
Sizes – (-, M, L, -) (-, -, -, -) only:
Rows 3 – 12:
Repeat Row 2 of Body.
– (-, -, 27, 31) (-, -, -, -) triangles
Sizes XS (S, -, -, -) (-, -, -, -) only:
Rows 3 – 13:
Repeat Row 2 of Body.
19 (23, -, -, -) (-, -, -, -) triangles
Bust Shaping (All Sizes):
Craft Yarn Council Women’s measurements are based on a B-cup bra size across all bust sizes, and as all bodies are different shapes and bra sizes, it may be necessary for makers to add in some bust shaping to ensure a good fit.
Unfortunately this is not an exact science as it is dependant on which size you have chosen to make along with your specific body shape, however if you are larger than a B-cup, I would recommend following the below guidelines to work out how much bust shaping you may wish to add, and where, and then trying on the garment to check the fit.
After working 4 rows of the Body, count in 5 (6, 6, 7, 7) (8, 8, 8, 9) triangles from the front opening on each side, and place a marker in the next sc.
Try the garment on; if you follow the direction of the stitches for a few inches, the marker should be at a place where it will approximately intersect with your bust point. If this is not the case, move the st marker to your desired placement, ensuring it is the same on both sides.
To work out how many increase rows to add, use the following as a starting point: For every inch difference between the actual (not finished) bust measurement of the size you are making and your actual bust circumference, add in one increase at each marked st, working the additional repeat in the sc as per the Yoke increases already worked.
Alternatively, for every Bra cup size that you are larger than a B cup, add in one increase at each marked st, as above. (C-cup = 1 increase row, D-cup = 2 increase rows, etc…)
Note that the increase rows count towards your total Row 2 repeats worked in the Body section, so continue to follow the total number of rows indicated for your size, as listed in that section, before proceeding to the End of Body.
Each increase row you add however, will add 2 triangles to your triangle st count for each row (1 increase per side). Keep a note of this revised st count so that you can ensure your st counts remain correct.
Using my measurements as an example:
Size Large has an actual bust circumference of 42”, as per the schematic above. I personally have a bust circumference of 45”, which is 3 inches larger.
I chose to make the size Large for myself because I have a small frame and narrower shoulders, with a larger bra size, so I selected a size that would be a good fit for my upper arms and shoulders. Using the guidelines above I added in a bust increase at the marked st, moving the marker up to the next sc each row, for a total of 3 rows. This gave me 6 additional triangles in my st count; 3 on each side.
Make sure that you work at least 2 plain Row 2 repeats after your increases before you try on the garment in order to check the fit. This helps it to lay flat so that you can have a clear picture of how the increases are currently sitting. Add or remove increases as necessary before proceeding, trying on as many times as you need to make sure that you have your perfect desired shaping and drape around the side of your bust.
End of Body Section (All Sizes):
Row 1:
Ch 1, sc in first dc3tog, ch 2, dc3tog over (same st, next dc2tog and next ch-2 space), ch 3, sc in sc, ch 3, dc3tog over (next ch-2 space, next dc2tog and the following dc2tog), ch 2, sc in same st, *ch 2, dc2tog over (same st and next dc2tog), ch 2, sc in same st; repeat from * until three dc clusters remain, ch 2, dc3tog over (same st, next dc2tog, next ch-2 space), ch 3, sc in sc, ch 3, dc4tog over (next ch-2 space, next dc2tog, last dc3tog twice), turn (leave last sc unworked).
Crop: 16 (20, 24, 28, 31) (35, 37, 42, 45) triangles, or Waist: 12 (16, 20, 24, 27) (31, 33, 38, 41) triangles (dec of 3 triangles).
Row 2:
Ch 1, sc in first dc4tog, *ch 2, dc2tog over (same st and next dc cluster), ch 2, sc in same st; repeat from * until one dc cluster remains, ch 2, dc3tog over (same st and last dc3tog twice), turn (leave last sc unworked).
Crop: 15 (19, 23, 27, 30) (34, 36, 41, 44) triangles, or Waist: 11 (15, 19, 23, 26) (30, 32, 37, 40) triangles (dec of 1 triangle).
If your End of Body Row 2 finishes on a RS, follow directions for Rnd 3a.
If your End of Body Row 2 finishes on a WS, follow directions for Rnd 3b.
Rnd 3(a) (RS): Do not turn at end of last Row 2 repeat, but continue with RS facing, working over front edge row ends towards neckline.
Ch 1, evenly place 3 sc in each row end towards neckline. Continuing around neckline; work 1 sc in each fsc, skipping both ‘raglan corner’ fsc around back of neckline. Working down opposite front row ends; evenly place 3 sc in each row end. Rotate to work across the back; sc in first st, *sc in ch-2 space, hdc in sc, sc in ch-2 space, sc in dc2tog; repeat from * across to end, join with sl st to first sc.
Crop: 190 (210, 220, 240, 250) (270, 278, 296, 308) sts, or Waist: 198 (218, 228, 248, 258) (278, 286, 304, 316) sts.
Rnd 3(b) (RS): With RS facing.
Ch 1, sc in first st, *sc in ch-2 space, hdc in sc, sc in ch-2 space, sc in dc2tog; repeat from * across back. Rotate to work up row ends towards neckline; evenly place 3 sc in each row end. Continuing around neckline; work 1 sc in each fsc, skipping both ‘raglan corner’ fsc around back of neckline. Working down opposite front row ends; evenly place 3 sc in each row end, join with sl st to first sc.
Crop: 190 (210, 220, 240, 250) (270, 278, 296, 308) sts, or Waist: 198 (218, 228, 248, 258) (278, 286, 304, 316) sts.
All Sizes:
Rnd 4 (RS):
Ch 1, sc in each st around, join with sl st to first sc.
Crop: 190 (210, 220, 240, 250) (270, 278, 296, 308) sc, or Waist: 198 (218, 228, 248, 258) (278, 286, 304, 316) sc.
Rnd 5 (RS): (Using a hook 1-2 sizes larger than gauge hook)
Loosely sl st BLO in each st around, ensuring it does not cause the fabric to pull in or tuck under itself.
Crop: 190 (210, 220, 240, 250) (270, 278, 296, 308) sl st, or Waist: 198 (218, 228, 248, 258) (278, 286, 304, 316) sl st.
Fasten off.
Sleeves
Short Sleeve Option
To reinforce underarm seam, rejoin yarn with RS facing in sc just before underarm join, sl st to next/opposite sc just after underarm join.
Rnd 1 (RS):
Ch 1 (does not count as a st), *hdc in sc, sc in ch-2 space, sc in dc2tog, sc in ch-2 space; repeat from * around, hdc in last sc, join with sl st to first hdc.
45 (49, 53, 57, 65) (69, 69, 73, 77) sts.
Rnd 2 (RS):
Ch 1, sc in each st around, join with sl st to first sc.
45 (49, 53, 57, 65) (69, 69, 73, 77) sc.
Continue with same hook size for sl st rnd, to slightly pull the fabric in a little.
Rnd 3 (RS):
Sl st BLO in each st around.
45 (49, 53, 57, 65) (69, 69, 73, 77) sl st.
Long Sleeve Option
To reinforce underarm seam, rejoin yarn with RS facing in sc just before underarm join, sl st to next/opposite sc just after underarm join.
Make a note of any customizations made, to duplicate for the 2nd sleeve.
Dec Rnd 1:
Ch 2 (does not count as a st), sl st in top of next dc2tog, turn to opposite side (WS) facing, sl st in top of next dc2tog (creates underarm seam), ch 1, sc in same st, *ch 2, dc2tog over (same st and next dc2tog), ch 2, sc in same st; repeat from * around to and including last dc2tog, join with sl st to first sc.
10 (11, 12, 13, 15) (16, 16, 17, 18) triangles (dec of 1 triangle).
Sizes 3X and 4X only, proceed to Rnd 4
Sizes XS (S, M, L, XL) (2X, -, -, 5X) only:
Dec Rnd 2:
Repeat Dec Rnd 1.
9 (10, 11, 12, 14) (15, -, -, 17) triangles (dec of 1 triangle).
Sizes XS, S and 5X only, proceed to Rnd 4
Sizes – (-, M, L, XL) (2X, -, -, -) only:
Dec Rnd 3:
Repeat Dec Rnd 1.
– (-, 10, 11, 13) (14, -, -, -) triangles (dec of 1 triangle).
All Sizes
Rnd 4:
Turn, ch 3, dc in top of first dc2tog, ch 2, sc in same st, *ch 2, dc2tog over (same st and next dc2tog), ch 2, sc in same st; repeat from * around to and including last dc2tog, ch 2, dc2tog over (same st and last sc), join with sl st to top of first dc.
8 (9, 9, 10, 12) (13, 15, 16, 16) triangles, 2 half triangles (1 each at beginning and end of rnd).
Rnd 5:
Turn, ch 1, sc in first dc2tog, *ch 2, dc2tog over (same st and next dc2tog), ch 2, sc in same st; repeat from * around to and including last dc2tog, join with sl st to top of first sc.
9 (10, 10, 11, 13) (14, 16, 17, 17) triangles
Rnd 6 onwards:
Repeat Rnds 4 – 5 a total of 4 (4, 4, 4, 4) (4, 5, 5, 5) more times, or until approximately 1” past elbow, ending on a Rnd 5 repeat.
(Not all sizes may need this next mid-sleeve dec rnd at the beginning of the forearm, particularly smaller sizes. If you prefer a straighter sleeve rather than fitted, sk this dec rnd.)
Mid Sleeve Dec Rnd:
Repeat Dec Rnd 1.
8 (9, 9, 10, 12) (13, 15, 16, 16) triangles (dec of 1 triangle).
Forearm onwards:
Repeat Rnds 4 – 5 a total of 2 more times, or until desired Sleeve length less 1” is reached, ending on a Rnd 5 repeat.
Final Ends and Finishing
End of Sleeve Dec Rnd:
Repeat Dec Rnd 1.
7 (8, 8, 9, 11) (12, 14, 15, 15) (dec of 1 triangle).
Cuff Rnd 1 (RS): If not already RS facing, turn.
Ch 1 (does not count as a st), *hdc in sc, sc in ch-2 space, sc in dc2tog, sc in ch-2 space; repeat from * around, hdc in last sc, join with sl st to first hdc.
29 (33, 33, 37, 45) (49, 57, 61, 61) sts.
Cuff Rnd 2 (RS):
Ch 1, sc in each st around, join with sl st to first sc.
29 (33, 33, 37, 45) (49, 57, 61, 61) sc.
Continue with same hook size for sl st rnd, to slightly pull the fabric in a little.
Cuff Rnd 3 (RS):
Sl st BLO in each st around.
29 (33, 33, 37, 45) (49, 57, 61, 61) sl st.
Fasten off. Repeat for 2nd Sleeve.
Finishing
Lightly steam block to open up sts and straighten edges, weave in all ends. And most importantly, enjoy your new stylish addition to your wardrobe!
I’d love to see your finished makes! Please tag me on your favourite social media platform using @talesofknots and #MoonflowerBolero so that I can see and share your lovely crochet cardigans!
I hope you enjoyed making the Moonflower Crochet Bolero, and please don’t hesitate to reach out to me if you have any questions. And don’t forget to sign up to my Tales of Knots Newsletter so you never miss a new release!

Need any help with this pattern?
Submit your question in our contact form below!

2 Comments