

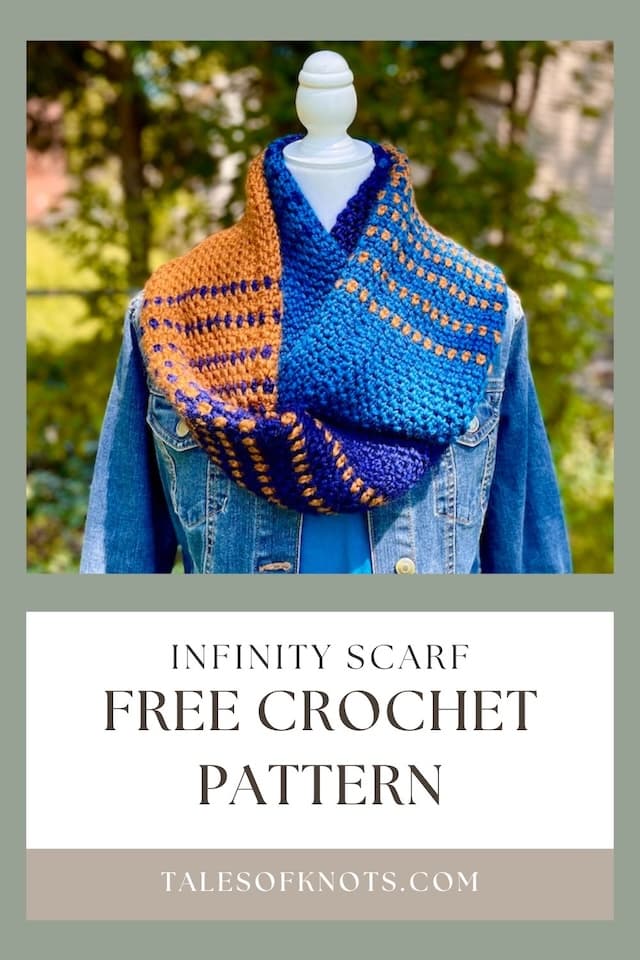
Wanderer Crochet Infinity Scarf Free Pattern – Beginner-Friendly Design
Travel in Comfort with the Wanderer Infinity Crochet Scarf | Free Crochet Pattern
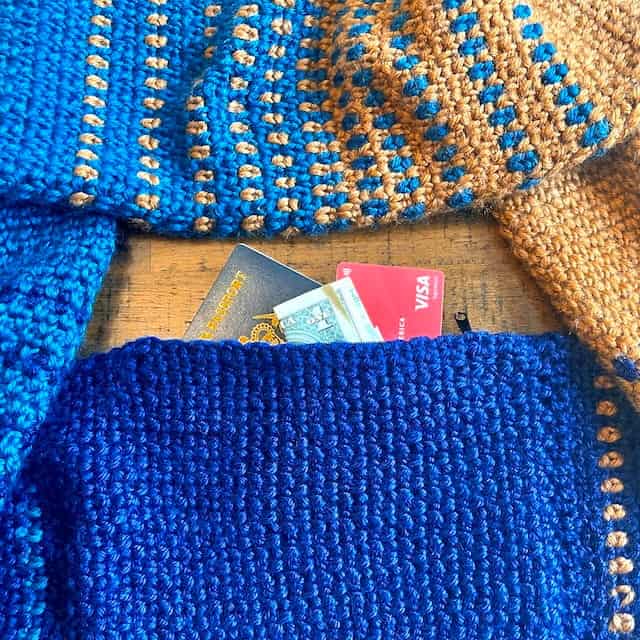
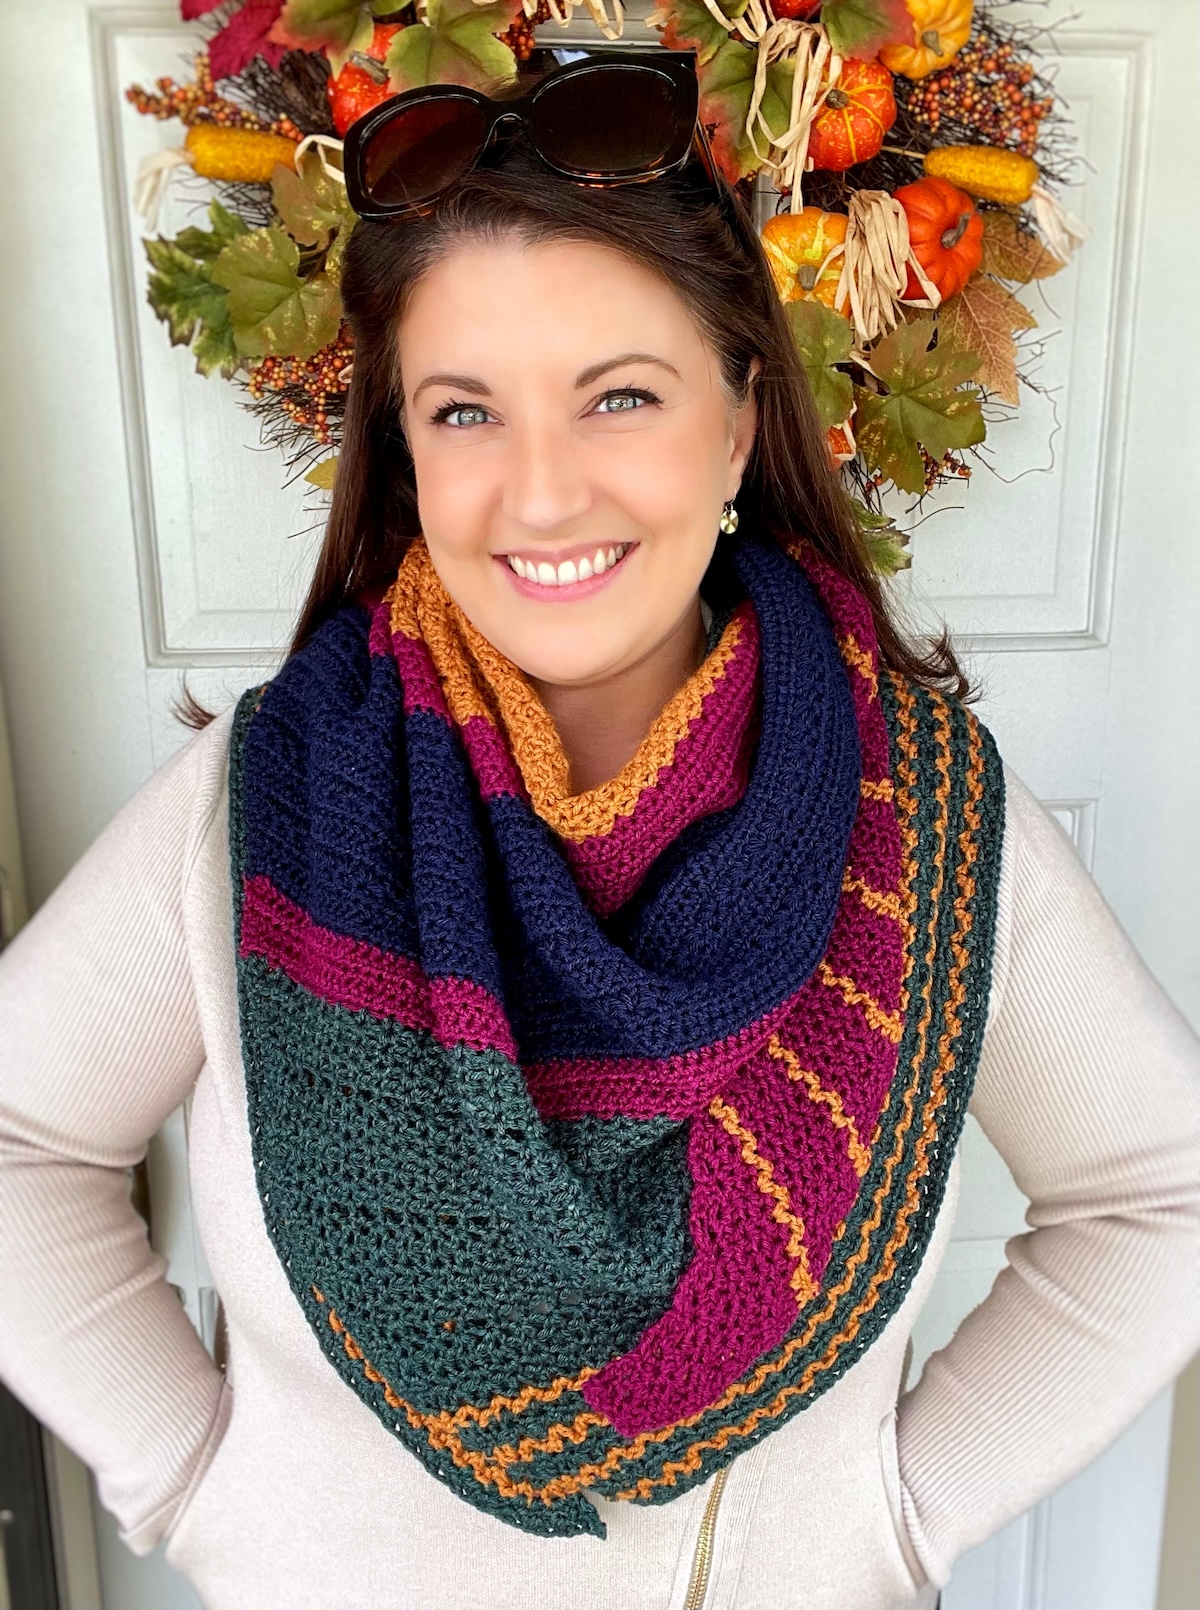
The Wanderer Crochet Infinity Scarf is the perfect accessory for those of us who love to travel or be in the great outdoors, yet also want to stay warm and cozy! The optional addition of a hidden pocket with a sturdy lining (that can carry anything from your passport to hidden crochet supplies!) makes this a must-have item when on the go.
*Disclosure: The Wanderer Infinity Scarf crochet pattern was sponsored by Crochet Foundry for the 2023 blog hop, with yarn and hook provided for the design. This post contains affiliate links, and at no additional cost to you, I may earn a commission if you decide to make a purchase after clicking through the link. Please see my Privacy Policy for full details. Thank you for supporting Tales of Knots!
The Yarn
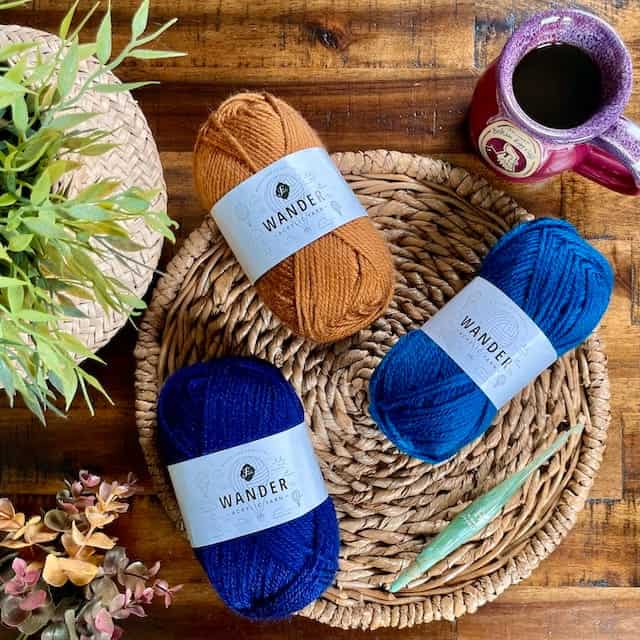
Let’s start with the yarn I used. Provided for this design by Furls Crochet, Furls Wander is a medium worsted, 100% acrylic yarn, available in a ton of vibrant colours. It comes in 100g bullet skeins of 120 yards, and for an acrylic yarn, I am always pleasantly surprised by its softness.
If you want to read more details about the yarn such as how it works up, the best hooks to use, and my recommended substitutes, check out my full Furls Wander Yarn review.
The Hook
If you’ve seen any of my other patterns, you’ll know that my go-to hooks are Furls Crochet hooks. The Streamline Swirl was the first non store-bought hook I purchased years ago, and the Streamlines are still a favourite!
Wanderer Crochet Infinity Scarf Supplies:
Yarn and Yardage:
- Medium worsted (size 4) Furls Wander acrylic yarn in 3 colours: Midnight (color A), Laguna (color B), and Thatch (color C) – 2 skeins each (240 yds per color required)
Crochet Hook:
- 5.00 mm (US H-8) Furls crochet hook
Notions:
- Yarn needle (for seaming)
- Scissors
- Stitch markers
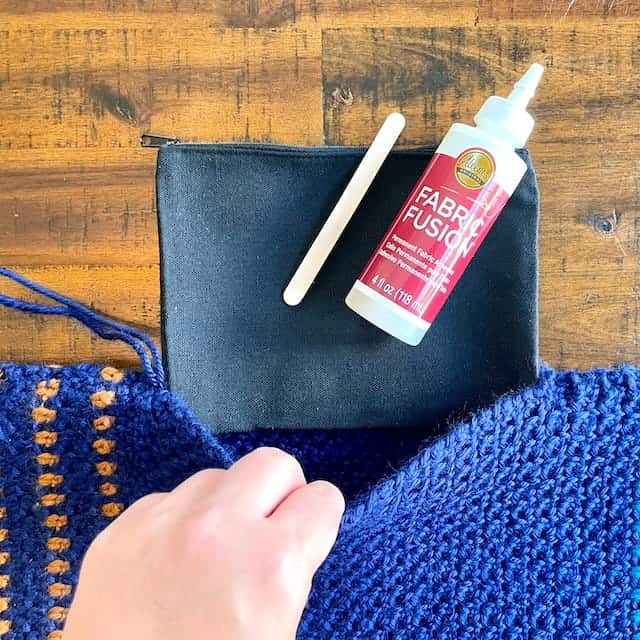
- Canvas bag insert 8 x 5.5”, optional, for pocket
- Aleene’s Fabric Fusion glue, optional, for pocket
- Craft stick, optional, for pocket
Skill Level:
- Adventurous beginner
Gauge: 4×4 in / 10×10 cm
- 16 sts x 16 rows in linen stitch, blocked
Abbreviations:
- ch(s) = chain(s)
- ch-sp = chain space
- FLO = front loop only
- Fsc = foundation single crochet (see below)
- inv sl st = invisible slip stitch (see below)
- RS = right side
- sc = single crochet
- sk = skip
- sl st = slip stitch
- st(s) = stitch(es)
- WS = wrong side
- yo = yarn over
Infinity Scarf Finished Measurements:
- Length before seaming: 61.5″
- Height against neck: 6.75″
Special Stitches:
Invisible Slip Stitch (inv sl st): Pull up some slack on the yarn loop and remove your hook. Keep the working yarn tail to the WS and insert your hook from back to front (WS to RS) in the first st of the round. Place the yarn loop back on the hook and pull through to WS of work. Pull the st tight to reduce visibility of the join. Only used on RS rounds.
Foundation Single Crochet (fsc): Ch 2, insert hook in second ch from hook, yo, pull up loop, yo, pull through 1 loop (ch made), yo, pull through 2 loops (sc made), *insert hook in ch of previous st, yo, pull up loop, yo, pull through 1 loop (ch made), yo, pull through 2 loops (sc made); repeat from * until required number of fsc have been made. Check out this video tutorial for foundation stitches by Sarah of SEKhandmade for further help with this stitch.
Wanderer Crochet Infinity Scarf Pattern Notes:
Pattern is written in US terms.
Turning chains at the beginning of rows/rounds do not count as stitches.
Chain-1 spaces in the linen stitch pattern (sc, ch 1, sk 1) do count as a stitch.
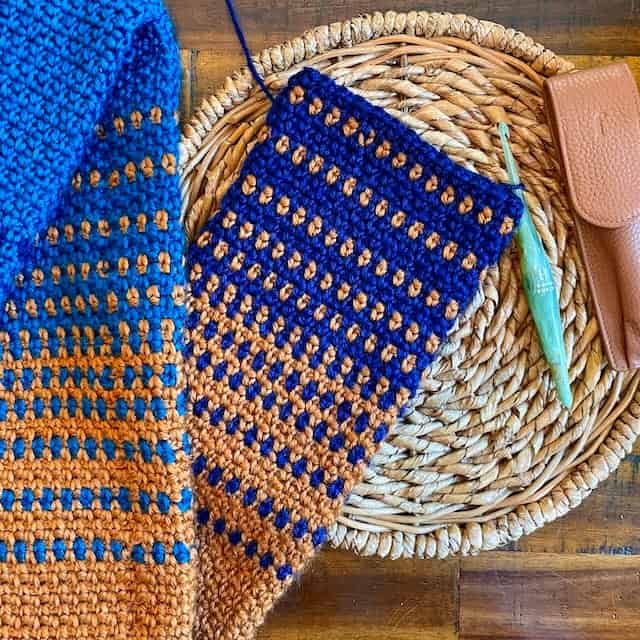
Scarf is worked as a long tube and then seamed end to end to create the infinity loop.
As the wrong side is on the inside of the tube, there is no need to weave in ends. Simply knot them together and trim as you go.
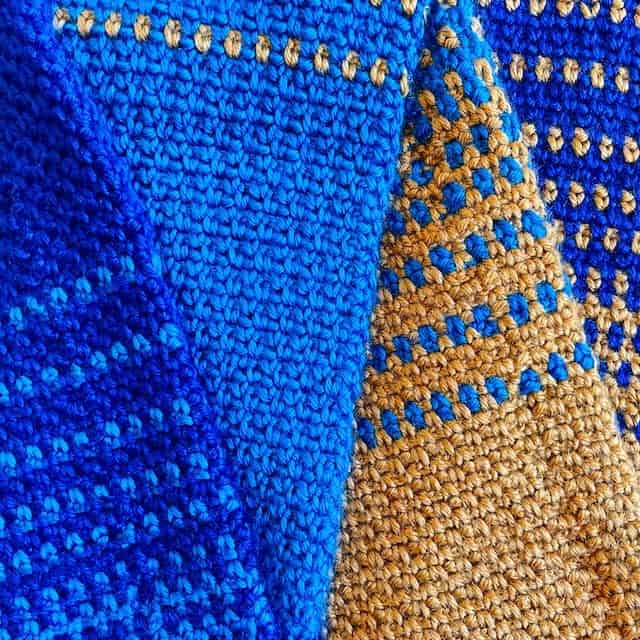
Similarly, do not cut yarn when changing colors in Sections 2, 4, and 6 but instead keep the floats to the wrong side of the work during the color fade.
Stitch counts are noted in parentheses at the end of a row/round, unless there is no change from the previous row/round.
Invisible slip stitches are used to join rounds on the right side, and regular slip stitches are used to join rounds on the wrong side; this helps to keep the little bump formed by the slip stitch always on the wrong side of the work, making the seam less noticeable.
Section 1 is written first for the plain Infinity Scarf option (without the pocket feature), with the hidden passport pocket variation after. Sections 2-6 are then worked the same for both variations.
Solid Color Sections consist of 40 rounds, while the Color Fade Sections have 42; = 246 total rounds. Section 1 however has 38 rounds as the remaining 2 are worked after Section 6, so that the seam of the Scarf is not over a color change.
Each section row/round numbers restart from 1 on the right side to help keep track more easily of rounds worked in the different colors.
Pocket Variation Pattern Notes:
The hidden passport pocket is included in the pattern as an option, and an opening is left in Section 1 to add the pocket lining at the end.
The beginning of Section 1 for this option is worked flat, in turned rows, before being joined in the round to continue working the remainder of the scarf as a tube.
Once finished and seamed, the canvas bag insert is then added to the opening left in Section 1 and secured in place using fabric adhesive. If you prefer, the pocket could also be sewn in place, however this will not provide the same stability as the fabric adhesive if using the pocket for heavier items.
If preferring not to use a canvas insert, which will add a little bit of weight to the scarf, you could also use the stitch pattern to create your own insert! simply crochet a rectangle as tall as the pocket opening and as wide as the full circumference of the scarf, then fold it in half vertically and seam along the sides. Tuck this inside your scarf and seam into place.
Check out the Amazon links above in the supplies list for the canvas makeup bags I used for the pocket lining, as well as Aleene’s Fabric Fusion glue and some craft sticks. Alternatively you can purchase them or similar from your local craft store. Feel free also to create your own cotton or fabric lining to add to your scarf! For full photo tutorials of stitches and pocket assembly, check out the full pattern PDF available at the links below:

Wanderer Crochet Infinity Scarf Pattern Instructions:
Section 1: Solid Color, WITHOUT pocket
With Color A:
Round 1 (RS): Fsc 54.
(Alternatively: Ch 55, and beginning in the 2nd ch from hook, sc in each back bump across.)
Without twisting, join in the round with inv sl st to first st. Use beginning yarn tail to close the gap left at the bottom of the sts. (54 sts)
Customization Note: If you desire a taller or shorter scarf, as measured against the back of the neck, add or remove sts in multiples of 2 here in Round 1 to reach your desired tube circumference.
Round 2 (WS): Ch 1 (does not count as a st here and throughout), turn, sc in first st, *ch 1, sk 1, sc in next st; repeat from * around to last st, ch 1, sk last st, join with sl st to first sc. (27 sc, 27 chs)
Round 3: Ch 1, turn, sc in first ch-1 sp, *ch 1, sk next sc, sc in next ch-1 sp; repeat from * around to last st, ch 1, sk last sc, join with inv sl st to first sc.
Rounds 4-38: Repeat Round 3, joining with an inv sl st on the RS, and a regular sl st on the WS.
Customization Note: If you desire a longer or shorter length for the infinity loop of the scarf, add or remove rounds in multiples of 2 equally to/from all Solid Color Sections (1, 3, and 5).
Move to Section 2.
Section 1 Alternative: Solid Color, WITH opening for pocket
With Color A:
Row 1 (RS): Fsc 54.
(Alternatively: Ch 55, and beginning in the 2nd ch from hook, sc in each back bump across.) (54 sts)
Customization Note: If you desire a taller or shorter scarf, as measured against the back of the neck, add or remove sts in multiples of 2 here in Row 1 to reach your desired tube circumference.
Row 2 (WS): Ch 1 (does not count as a st here and throughout), turn, sc in first st, *ch 1, sk 1, sc in next st; repeat from * across to last st, sc in last st. (28 sc, 26 chs)
Row 3: Ch 1, turn, sc in first sc, *ch 1, sk next sc, sc in next ch-1 sp; repeat from * across to last st, sc in last st.
Rows 4-33: Repeat Row 3.
At end of Row 33, bring the beginning edge around to meet the opposite edge, RS facing out, and inv sl st to first sc to join the 2 sides.
Begin working in the round.
Round 34: Ch 1, turn, sc in first sc, *ch 1, sk next sc, sc in next ch-1 sp; repeat from * around to last st, ch 1, sk last st, join with sl st to first sc. (27 sc, 27 chs)
Round 35: Ch 1, turn, sc in first ch-1 sp, *ch 1, sk next sc, sc in next ch-1 sp; repeat from * around to last st, ch 1, sk last sc, join with inv sl st to first sc.
Rounds 36-38: Repeat Round 35, joining with an inv sl st on the RS, and a regular sl st on the WS.
Customization Note: If you desire a longer or shorter length for the infinity loop of the scarf, add or remove rounds in multiples of 2 equally from all Solid Color Sections (1, 3, and 5).
Move to Section 2.
Section 2: Color Fade
Prepare to join Color B:
Note: For all color changes in this section: Do not cut yarn, drop yarn tail of working color to WS and pull up a loop in next color. This replaces the turning ch-1 at the beginning of rounds when changing from one color to the next.
Round 1 (RS): Change to color B, turn, sc in first ch-1 sp, *ch 1, sk next sc, sc in next ch-1 sp; repeat from * around to last st, ch 1, sk last sc, join with inv sl st to first sc. (1 Round of color B)
Rounds 2-5: Change to color A, repeat Round 1, joining with an inv sl st on the RS, and a regular sl st on the WS. (4 Rounds of color A)
Make sure all yarn floats are left a little loose and kept to the WS of your work.
Round 6: Change to color B, repeat Round 1. (1 Round of color B)
Rounds 7-10: Change to color A, repeat Round 1. (4 Rounds of color A)
Round 11: Change to color B, repeat Round 1. (1 Round of color B)
Rounds 12-14: Change to color A, repeat Round 1. (3 Rounds of color A)
Round 15: Change to color B, repeat Round 1. (1 Round of color B)
Rounds 16-17: Change to color A, repeat Round 1. (2 Rounds of color A)
Round 18: Change to color B, repeat Round 1. (1 Round of color B)
Rounds 19-20: Change to color A, repeat Round 1. (2 Rounds of color A)
Round 21: Change to color B, repeat Round 1. (1 Round of color B)
Round 22: Change to color A, repeat Round 1. (1 Round of color A)
Note: Rounds 21 and 22 are the center of the color fade section; Rounds 1 to 20 and Rounds 23 to 42 are mirrored.
Rounds 23-24: Change to color B, repeat Round 1. (2 Rounds of color B)
Round 25: Change to color A, repeat Round 1. (1 Round of color A)
Rounds 26-27: Change to color B, repeat Round 1. (2 Rounds of color B)
Round 28: Change to color A, repeat Round 1. (1 Round of color A)
Rounds 29-31: Change to color B, repeat Round 1. (3 Rounds of color B)
Round 32: Change to color A, repeat Round 1. (1 Round of color A)
Rounds 33-36: Change to color B, repeat Round 1. (4 Rounds of color B)
Round 37: Change to color A, repeat Round 1. (1 Round of color A)
Rounds 38-41: Change to color B, repeat Round 1. (4 Rounds of color B)
Round 42: Change to color A, repeat Round 1. (1 Round of color A)
Fasten off color A. Move to Section 3.
Click the links below to the full crochet infinity scarf pattern PDF for photos and a detailed color chart of all changes in Section 2:
Section 3: Solid Color
Continue with Color B:
Round 1 (RS): Ch 1, turn, sc in first ch-1 sp, *ch 1, sk next sc, sc in next ch-1 sp; repeat from * around to last st, ch 1, sk last sc, join with inv sl st to first sc.
Rounds 2-40: Repeat Round 1, joining with an inv sl st on the RS, and a regular sl st on the WS.
Section 4: Color Fade
Prepare to join Color C:
Rounds 1-42: Repeat Section 2, fading through from color B to color C, starting Round 1 with color C.
Where instructions state to use color A, now use color B, and where instructions state to use color B, now use color C.
Fasten off color B at end.
Section 5: Solid Color
Continue with Color C:
Round 1 (RS): Ch 1, turn, sc in first ch-1 sp, *ch 1, sk next sc, sc in next ch-1 sp; repeat from * around to last st, ch 1, sk last sc, join with inv sl st to first sc.
Rounds 2-40: Repeat Round 1, joining with an inv sl st on the RS, and a regular sl st on the WS.
Section 6: Color Fade
Prepare to join Color A:
Rounds 1-42: Repeat Section 2, fading through from color C to color A, starting Round 1 with color A.
Where instructions state to use color A, now use color C, and where instructions state to use color B, now use color A.
Fasten off color C at end.
Final Rounds and Seaming
Continue with Color A:
Round 1 (RS): Ch 1, turn, sc in first ch-1 sp, *ch 1, sk next sc, sc in next ch-1 sp; repeat from * around to last st, ch 1, sk last sc, join with inv sl st to first sc.
Round 2 (WS):
Ch 1, turn, sc in first ch-1 sp, *sl st FLO in next sc, sc in next ch-1 sp; repeat from * around to last st, sl st FLO in last sc, join with inv sl st to first sc. (27 sc, 27 sl st FLO, not including join.)
Fasten off color A, leaving a long tail for seaming.
Seam shorter ends of scarf together around the circumference of tube, using mattress stitch around. Line up the sts with markers to help keep aligned.
If not adding a pocket, weave in any remaining ends of the seam, and block lightly if desired. Enjoy!
Adding the Pocket to the Scarf:
Leave the remaining tail from the seam loose and block scarf to measurements, particularly over the opening left in Section 1, to open up the sts. I highly recommend washing any pocket insert you are using with fabric softener, particularly the cotton canvas insert, and scrunching up the fabric several times to soften it up as much as possible before inserting. If you’d prefer a much thinner cotton lining, here is a great crochet tote lining tutorial from Amber of Bliss This that you could also use to line this pocket opening before adding your own zipper.
To glue the pocket in place, insert the canvas bag or lining into the opening and check the placement and fit. Push the insert along as far as possible to the end of the opening from Section 1 (Round 34), so that if the opening is a little too long you can use the tail of the seam to close any remaining gap after the adhesive has dried.
Positioning the Pocket
Carefully apply the adhesive to one side of the insert and use a craft stick to spread it around a little. Open the zipper so that you can position the bag inside the opening with your hand inside the bag. Once you are happy with the placement, press the fabric down firmly and leave to dry with a small weight on top before doing the opposite side. Touch up the zipper edge if needed, weave in the remaining end of seam once dry. Congratulations, you’re done!
I’d love to see your finished makes! Please tag me on your favourite social media platform using @talesofknots and #WandererInfinityScarf so that I can see and share your lovely crochet scarves!
I hope you enjoyed making the Wanderer Infinity Scarf, and please don’t hesitate to reach out to me if you have any questions. And don’t forget to sign up to my Tales of Knots Newsletter so you never miss a new release!

Need any help with this pattern?
Submit your question in our contact form below!


2 Comments