
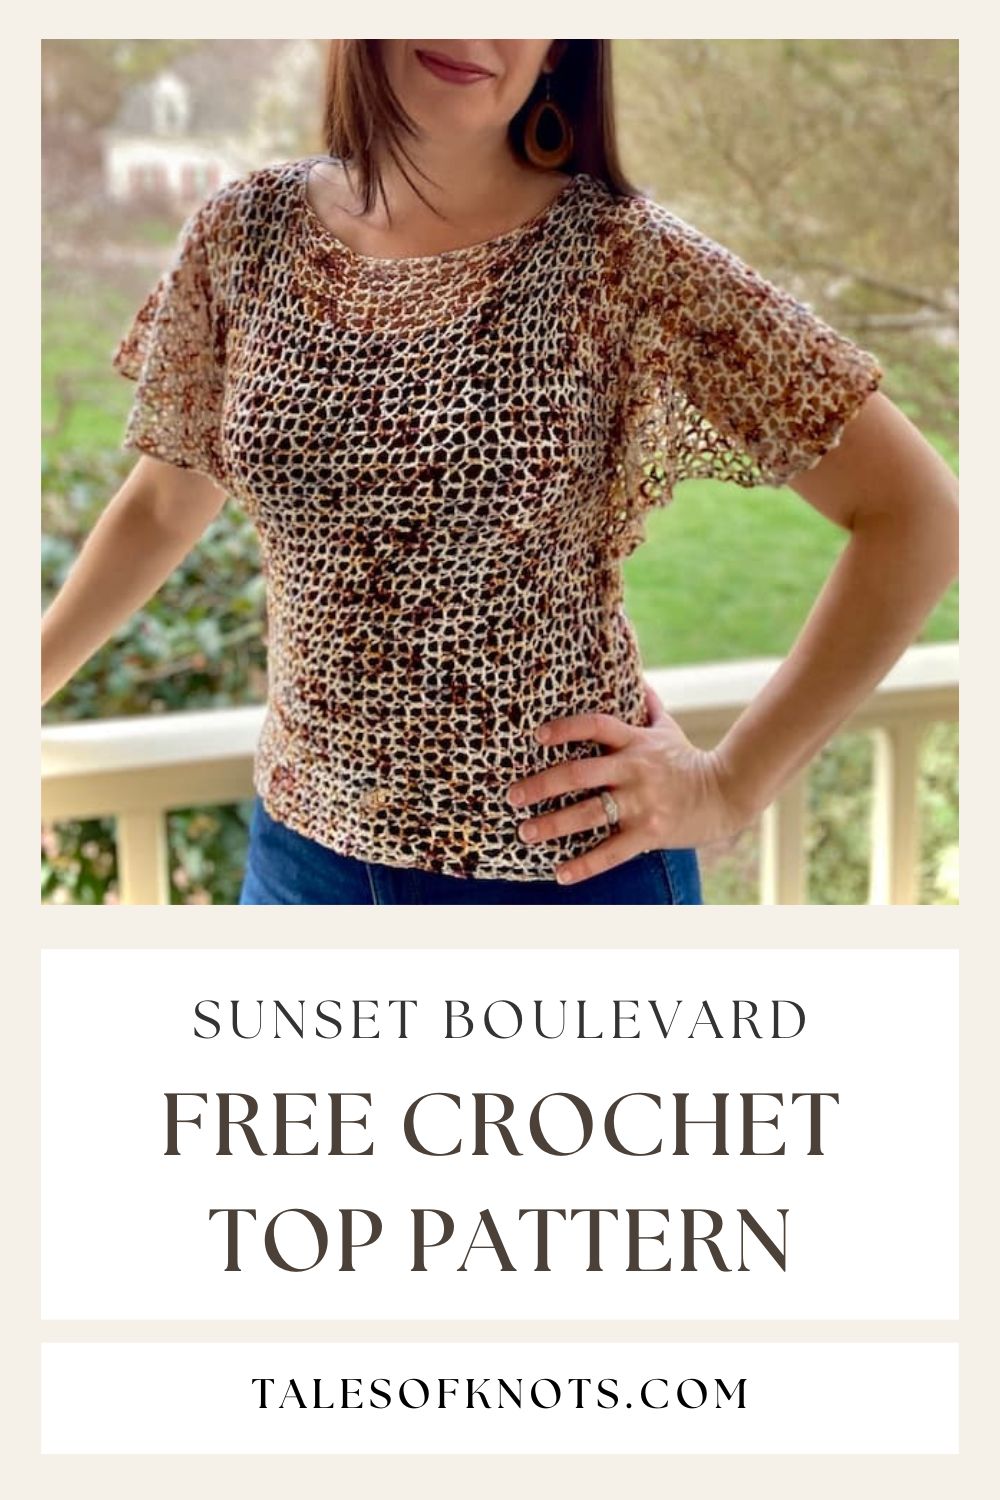
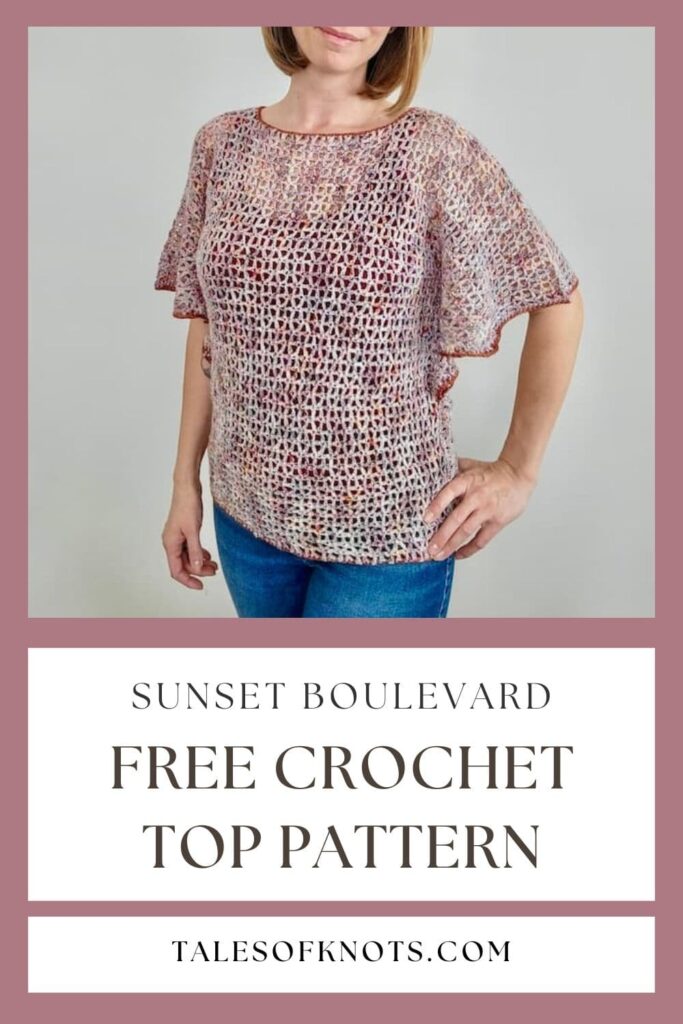
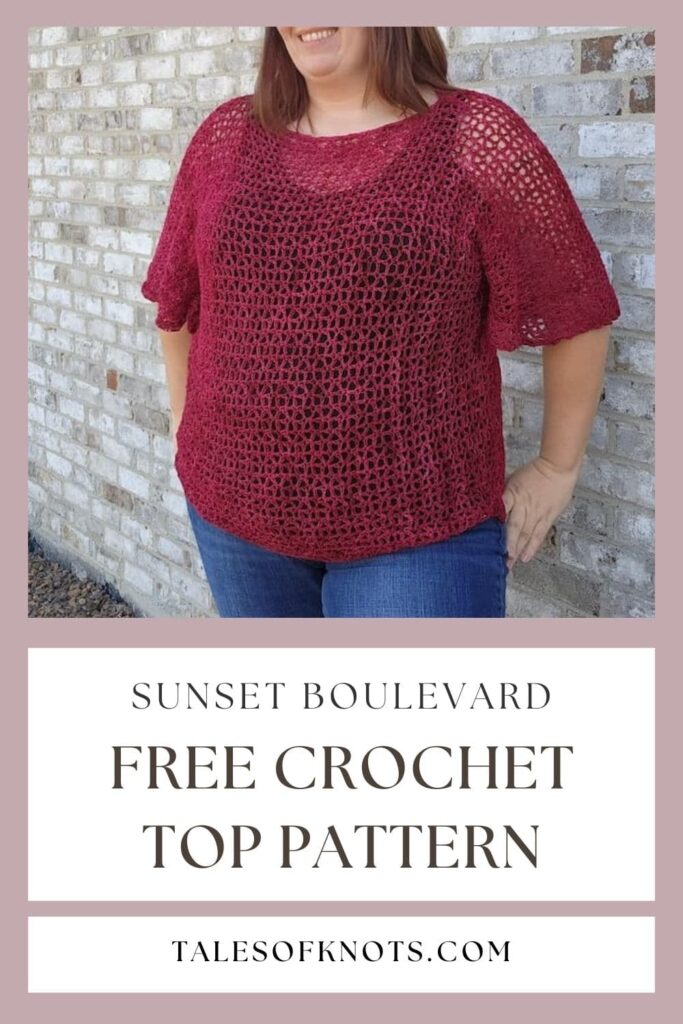
Sunset Boulevard Crochet Top Free Pattern – Romantic and Flowy!
Feel like a Hollywood starlet in the Sunset Boulevard Tee | Floaty Free Crochet Top Pattern
The Sunset Boulevard Crochet top was originally designed for a no-longer-operational yarn subscription company as an exclusive pattern for members. Now that the pattern has been returned to me, I’m so glad I get to offer it to all of you! This easy crochet design is worked in one piece with a repetitive stitch pattern that you’ll learn in no time, making it the perfect lightweight item to work on during warmer months.
*Disclosure: This post contains affiliate links, and at no additional cost to you, I may earn a commission if you decide to make a purchase after clicking through the link. Please see my Privacy Policy for full details. Thank you for supporting Tales of Knots!
The Design
The Sunset Boulevard Top was inspired by old Hollywood glamour. Fashion was showcasing statement sleeves in the Fall of ’22, and I wanted to design something that would bring to mind the vintage Kaftans and Muumuus worn by Hollywood Starlets of the Golden Age of Cinema. The floaty silhouette and waterfall sleeves of this crochet top certainly deliver! The design is intended to fit and flatter every shape due to its vertical stretch, eye catching lace, billowing sleeves and wide neck, while the easy lace stitch repeat and minimal side seaming ensures that it works up in no time with significantly less yardage than you’d expect!
Want to have a printable copy of the pattern PDF to take with you on the go?
Just click the buttons below to view my shops.
The Yarn
Originally designed with LL. Yarn Co. Single ply Superwash Merino Wool in the colour Sunset Strip, this design works just as well with any fingering weight yarn. Available in 9 sizes, from 30″ to 62″ actual bust circumference with 2-4″ positive ease designed in, the pattern only uses between 650-1270 yards (between 2-4 100g skeins of most fingering weight yarn). This makes this crochet top incredibly budget-friendly, and even provides the perfect occasion to use up those special skeins of hand-dyed yarn without breaking the bank.
Due to the nature of the construction, from one sleeve to the opposite sleeve, color blocking or self striping yarn is not the best choice for this project. I recommend any single color, tonal or variegated yarn to truly let the design and stitch pattern shine.
Sunset Boulevard Crochet Top Pattern Supplies:
Yarn:
- Fingering (size 1) weight, such as We Crochet Hawthorne Fingering yarn
Sizes:
- XS (S, M, L, XL) (2X, 3X, 4X, 5X)
Yardage:
- 650 (725, 800, 890, 960) (1035, 1115, 1205, 1270) yds
Crochet Hook:
- 5.00 mm (US H-8) Furls crochet hook
Notions:
Skill Level:
- Intermediate, designed to expand your crochet skills. The pattern assumes familiarity with basic crochet stitches as well as various single and double crochet stitch decreases. – Need help? Join the Tales of Knots Facebook Group to ask any questions!
Gauge: 4×4 in / 10×10 cm
- 3.5 ‘triangle’ st repeats x 10 rows in pattern repeat, blocked. ‘Triangle’ is counted as ‘sc, ch 2, dc, ch 2’, (i.e. from one sc to the next). See gauge swatch instructions below for full details.
Abbreviations (US crochet terms, see Special Stitches below for written descriptions of stitches in Bold):
- ch(s) = chain(s)
- ch-sp = chain space
- dc = double crochet
- dc2tog = double crochet 2 stitches together – decrease
- dctrtog = double crochet treble crochet worked together – decrease
- PM = place marker
- RS = right side
- sc = single crochet
- sc2tog = single crochet 2 stitches together – decrease
- sk = skip
- st(s) = stitch(es)
- stsc = stacked single crochet
- tr = treble crochet
- trdctog = treble crochet double crochet worked together – decrease
- WS = wrong side
- yo = yarn over
Special Stitches
Double Crochet 2 Together (dc2tog): Yo, insert hook in indicated st, yo and pull up a loop, yo, pull through 2 loops (2 loops on hook), yo, insert hook in next st, yo and pull up a loop, yo, pull through 2 loops, yo, pull through all 3 remaining loops on hook.
Double Crochet Treble Crochet Together (dctrtog): Yo, insert hook in indicated st, yo and pull up a loop, yo, pull through 2 loops (2 loops on hook), yo twice, insert hook in next st and pull up a loop (5 loops on hook), (yo, pull through 2 loops) twice, yo and pull through all 3 remaining loops on hook. This st is a decrease at the end of a row.
Single Crochet 2 Together (sc2tog): Insert hook in indicated st, yo and pull up a loop (2 loops on hook), insert hook in next st, yo and pull up a loop, yo, pull through all 3 loops on hook.
Stacked Single Crochet (stsc): Ch 1, sc in first st, insert hook in left leg of sc just made and work another sc on top. This st counts as a dc at the beginning of a row, and can be replaced with a dc, or 2-3 turning chs if preferred.
Treble Crochet Double Crochet Together (trdctog): Yo twice, insert hook in first st, yo and pull up a loop, (yo, pull through 2 loops) twice (2 loops on hook), yo, insert hook in next st, yo and pull up a loop (4 loops on hook), yo, pull through 2 loops, yo and pull through all 3 remaining loops on hook. This st is a decrease at the beginning of a row.
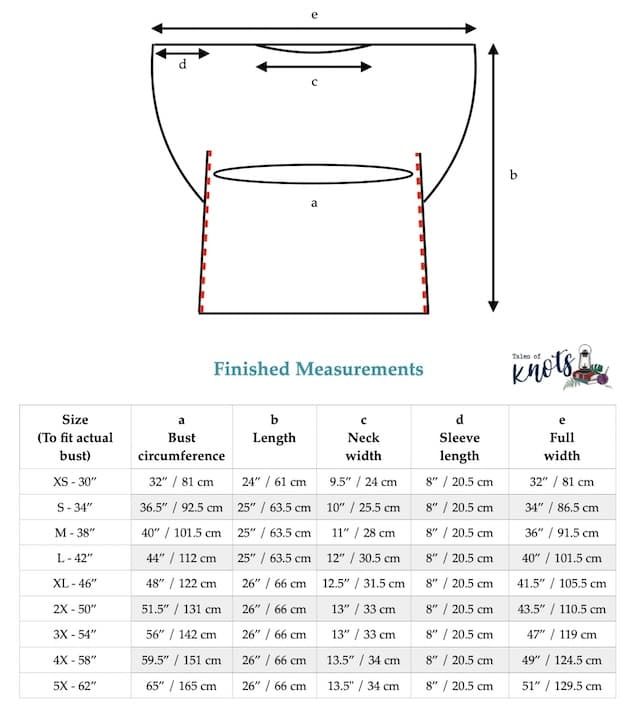
Schematic and Finished Measurements:
The Sunset Boulevard Crochet top is a size inclusive design, offering 9 sizes following standard Craft Yarn Council bust sizing, intended to be worn with 2-4″ positive ease. Check out the schematic below to help you choose the best size for your measurements.
For additional photos, customizations and full pattern stitch chart, grab the printable copy of the pattern PDF to take with you on the go.
Just click the buttons below to view my shops.
Gauge Swatch Instructions:
Ch 22 (or a multiple of 4+2).
Row 1: Sc in second ch from hook, *sk 1 ch, ch 2, dc in next ch, sk 1 ch, ch 2, sc in next ch*; repeat from * to * across to end, turn. (5 triangles)
Row 2: Stsc in first st (counts as first dc), *ch 2, sc in dc, ch 2, dc in sc*; repeat from * to * across to end, turn. (4 triangles, 2 half-triangles)
Row 3: Ch 1, sc in first st, *ch 2, dc in sc, ch 2, sc in dc*; repeat from * to * across to end, turn. (5 triangles)
Repeat Rows 2-3 for pattern.
Block before measuring finished gauge, as stitch pattern has a lot of natural stretch.
Sunset Blvd Crochet Top Pattern Notes:
Pattern includes approximately 2-4″ / 0-10 cm positive ease; choose your bust circumference (a) from the Finished Measurements above that corresponds to this for a comfortable fit. If you are inbetween sizes, I recommend choosing the smaller of the two if you prefer a closer-fitting top as the pattern has plenty of stretch. Choose the larger size if you are looking for a more oversized fit. If the length of the Body or Sleeves needs to be changed, these can be customized according to the instructions in the premium pattern PDF, available from Esty and Ravelry.
Turning chains at the beginning of rows do not count as stitches.
Garment is worked side to side (from the edge of one Sleeve, across the Body, and to the edge of opposite Sleeve.) It is then folded in half and seamed part-way up the sides, highlighted in red dashes on the schematic above.
At the end of the first Sleeve, additional chains are worked at both the beginning and end of the row to reach the desired project width for working the Body section (garment length). Note when customizing that for each triangle added to or removed from both the front AND the back, just over 1” / 2.5 cm will be added to or removed from the overall length of the garment. The work is split into Front and Back to work along the Neckline edge, then joined together at the opposite shoulder. Stitches are then left unworked at both the beginning and end of the row to begin the second Sleeve.
Stitch counts are written as ‘triangles’, which are counted as ‘sc, ch 2, dc, ch 2’ (one sc to the next). Half-triangle counts are also included, counting from a dc/tr to a sc, or vice versa.
Pattern and stitch counts are written as follows for sizes XS (S, M, L, XL) (2X, 3X, 4X, 5X).
Sunset Boulevard Pattern Directions:
Rows 4-20: Repeat Row 3.
(26 (28, 28, 28, 30) (30, 30, 30, 30) triangles, and 2 half-triangles).
PM in last tr made. Fasten off, turn to WS facing.
All Sizes: leaving a long tail (approx 50”) for seaming later, place a new slip knot on hook, and ch 28 (These are the additional Front Body chs).
Row 21 (WS): (With ch row still on hook, work this first st directly into last marked st of last Sleeve row just completed) Tr in marked st, remove marker, ch 2, sc in same st, *ch 2, dc in sc, ch 2, sc in dc*; repeat from * to * across row, working last sc in opposite edge tr of row below, ch 2, tr in last st, PM in tr just made, all sizes ch 29 for additional Back Body chs, turn.
(27 (29, 29, 29, 31) (31, 31, 31, 31) triangles, 2 half-triangles, 57 chs)
Body (First Shoulder)
Row 1 (RS): Sc in second ch from hook, *sk 1 ch, ch 2, dc in next ch, sk 1 ch, ch 2, sc in next ch*; repeat from * to * across chs, working last sc in marked tr at edge of Sleeve, remove marker, **ch 2, dc in sc, ch 2, sc in dc**; repeat from ** to ** across top of Sleeve working last sc in tr at opposite Sleeve edge, continuing on to work along the additional chs; repeat from * to * across to last ch, turn.
(42 (44, 44, 44, 46) (46, 46, 46, 46) triangles)
Row 2 (WS): Stsc in first st (counts as first dc here and throughout Body), *ch 2, sc in dc, ch 2, dc in sc*; repeat from * to * across to end, turn.
(41 (43, 43, 43, 45) (45, 45, 45, 45) triangles, and 2 half-triangles)
Row 3 (RS): Ch 1, sc in first st, *ch 2, dc in sc, ch 2, sc in dc; repeat from * across to end, turn.
(42 (44, 44, 44, 46) (46, 46, 46, 46) triangles)
Rows 4-8 (-10, -12, -14, -16) (-18, -20, -22, -26): Repeat Rows 2-3 of Body, ending on a Row 2 repeat.
Place a st marker for the Neckline split in the center dc of the last row. You will have 20 (21, 21, 21, 22) (22, 22, 22, 22) triangles and 2 half-triangles on either side of the marker.
Split For Neckline
Row 1 of Back (RS): Repeat Row 3 of Body to marker, placing last sc in marked dc, turn. Move marker up to sc just made and leave in place while working the remaining Back Neckline rows.
(21 (22, 22, 22, 23) (23, 23, 23, 23) triangles)
Rows 2-23 (-25, -25, -25, -27) (-27, -27, -27, -27) of Back: Repeat Rows 2-3 of Body between Back edge and Neckline edge, finishing on a Row 3 RS repeat at the Neckline edge.
PM in the last sc made. Fasten off.
Join yarn at marked sc at Neckline edge of Row 1 of Back. Note that the first 3 rows along the Front are decreasing along the Neckline edge. The rows are then worked straight until the last 2 rows, which begin increasing along the opposite end of the Neckline edge before re-joining to the Back with the row that follows after.
Row 1 of Front (RS): Stsc in sc, dc in next sc (counts as a dc2tog – move marker to the top of the dc to help identify the row end), ch 2, sc in next dc, *ch 2, dc in sc, ch 2, sc in dc; repeat from * across to end, turn.
(21 (22, 22, 22, 23) (23, 23, 23, 23) triangles)
Row 2 of Front (WS): Stsc in first st, *ch 2, sc in dc**, ch 2, dc in sc*; repeat from * to *, finishing last repeat at ** with 1 sc remaining unworked before marked dc2tog, ch 2, dc2tog over last sc and dc2tog of row below, turn. Move marker up to dc2tog.
(20 (21, 21, 21, 22) (22, 22, 22, 22) triangles, and 1 half-triangle)
Row 3 of Front (RS): Stsc in first st, dc in next sc (counts as a dc2tog), move marker up, ch 2, sc in dc, *ch 2, dc in sc, ch 2, sc in dc; repeat from * across to end, turn.
(20 (21, 21, 21, 22) (22, 22, 22, 22) triangles)
Row 4 of Front (WS): Stsc in first st, ch 2, sc in dc, *ch 2, dc in sc, ch 2, sc in dc; repeat from * across to end, turn.
(19 (20, 20, 20, 21) (21, 21, 21, 21) triangles, and 1 half-triangle)
Rows 5-21 (-23, -23, -23, -25) (-25, -25, -25, -25) of Front: Repeat Row 4 of Front, finishing at Front outer edge. Continue to move marker up each row to help identify Neckline edge.
Row 22 (24, 24, 24, 26) (26, 26, 26, 26) of Front (WS): Stsc in first st, ch 2, sc in dc, *ch 2, dc in sc, ch 2, sc in dc*; repeat from * to * across to and including last st, ch 2, dc in last st, move marker up to dc, turn.
(19 (20, 20, 20, 21) (21, 21, 21, 21) triangles, and 2 half-triangles)
Row 23 (25, 25, 25, 27) (27, 27, 27, 27) of Front (RS): Stsc in first st, move marker up to stsc, ch 2, sc in same first st, *ch 2, dc in sc, ch 2, sc in dc; repeat from * across to end, turn.
(20 (21, 21, 21, 22) (22, 22, 22, 22) triangles, and 1 half-triangle)
Row 24 (26, 26, 26, 28) (28, 28, 28, 28) of Front and Back (WS): (This row joins the Front and Back Necklines together) Stsc in first st, ch 2, sc in dc, *ch 2, dc in sc, ch 2, sc in dc*; repeat from * to * across, placing last sc in marked stsc of row below, ch 2, dc2tog over marked stsc and marked sc of the final row of the Back Neckline, **ch 2, sc in dc, ch 2, dc in sc**; repeat from ** to ** across to end, turn. Remove markers.
(41 (43, 43, 43, 45) (45, 45, 45, 45) triangles, and 2 half-triangles)
Body (Second Shoulder)
Row 1 (RS): Repeat Row 3 of Body.
(42 (44, 44, 44, 46) (46, 46, 46, 46) triangles)
Rows 2-8 (-10, -12, -14, -16) (-18, -20, -22, -26): Repeat Rows 2-3 of Body, ending on a Row 2 repeat.
(41 (43, 43, 43, 45) (45, 45, 45, 45) triangles, and 2 half-triangles)
Fasten off, leaving a long tail (approx 50”) for seaming.
With RS facing, place st markers in the 8th dc in from each side edge, including counting the edge sts. You will have 6 triangles, and 2 half-triangles between the marked dc and the edge on either side.
Join yarn at first marked dc on the RS.
Sleeve
Row 1 (RS): Ch 3, trdctog over marked dc and next sc, move marker up to the decrease to mark the row end, *ch 2, sc in dc**, ch 2, dc in sc*; repeat from * to * across, finishing last repeat at ** in last dc before marked dc, ch 2, dctrtog over last sc and marked dc, turn. Move marker up to the decrease to mark the row end.
(28 (30, 30, 30, 32) (32, 32, 32, 32) triangles)
Row 2 (WS): Ch 3, trdctog over marked st and next sc, *ch 2, sc in dc**, ch 2, dc in sc*; repeat from * to * across, finishing last repeat at ** in last dc before row end, ch 2, dctrtog over last sc and marked st, turn.
(27 (29, 29, 29, 31) (31, 31, 31, 31) triangles)
Continue to move markers up each row.
Rows 3-20: Repeat Row 2.
(9 (11, 11, 11, 13) (13, 13, 13, 13) triangles)
Row 21 (RS): Ch 1, sc2tog over first st and first ch-sp, sc in each sc, ch-sp, and dc across up to last sc, sc in last sc, sc2tog over last ch-sp and last st. (31 (39, 39, 39, 47) (47, 47, 47, 47) sts)
Fasten off. Block to measurements before seaming.
Finishing
Fold garment in half with outer Front and Back row edges together, RS facing out. Rotate the work so that the straight edge is now along the bottom and the Neckline along the top. Line up both layers of the fabric so that the stitches and rows are lined up evenly atop each other.
Using markers to help guide you and secure the fabric, seam up one of the short sides from the bottom edge to the base of the Sleeve using the mattress stitch in the edges of the rows, then working only from the topside, continue to seam together both layers in a direct line up through the fabric towards the shoulder using a running stitch, leaving a 7.5 (8, 8.5, 9, 9.5) (10, 10.5, 11, 11.5)” / 19 (20.5, 21.5, 23, 24) (25.5, 26.5, 28, 29) cm gap between the end of the seam and the shoulder for the armhole.
See schematic for the red/white dashes indicating the line to seam. Ensure that when you reach the Sleeve you continue to work in a direct line upwards through the fabric in order to achieve the floaty waterfall sleeves, and do not simply seam the outer edges of the Sleeve together. Repeat for other side.
Watch this short seaming video on Instagram to see a quick example of how to seam.
I’d love to see your finished makes! Please tag me on your favourite social media platform using @talesofknots and #SunsetBoulevardTop so that I can see and share your lovely crochet tops!
I hope you enjoyed making the Sunset Boulevard Top, and please don’t hesitate to reach out to me if you have any questions. And don’t forget to sign up to my Tales of Knots Newsletter so you never miss a new release!

Need any help with this pattern?
Submit your question in our contact form below!
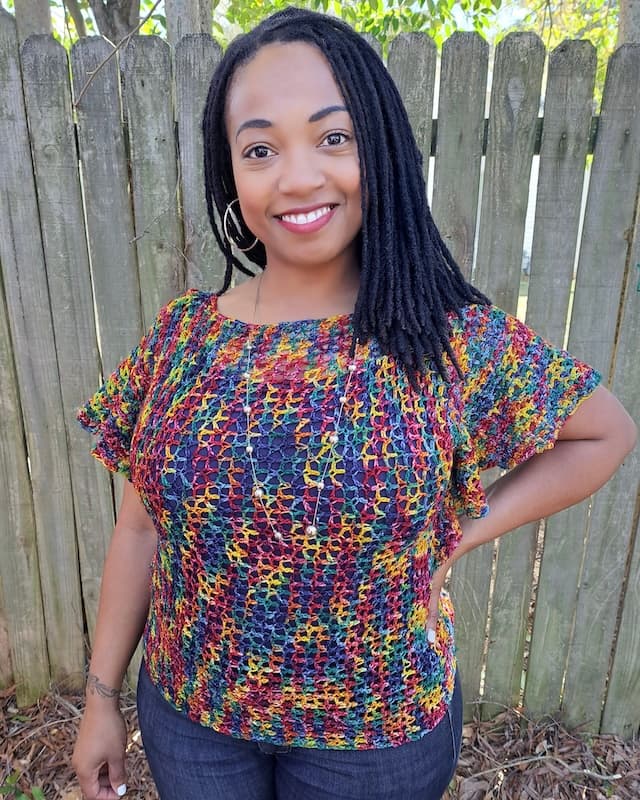
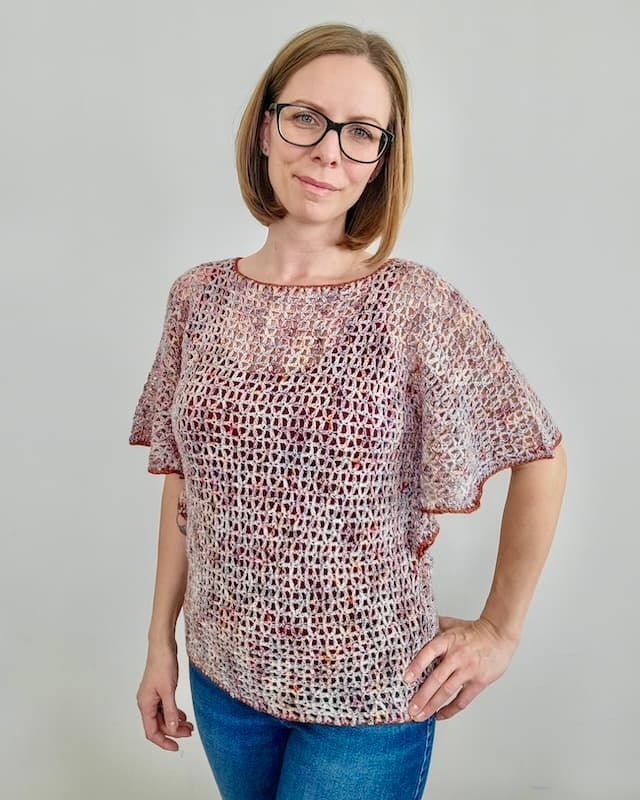
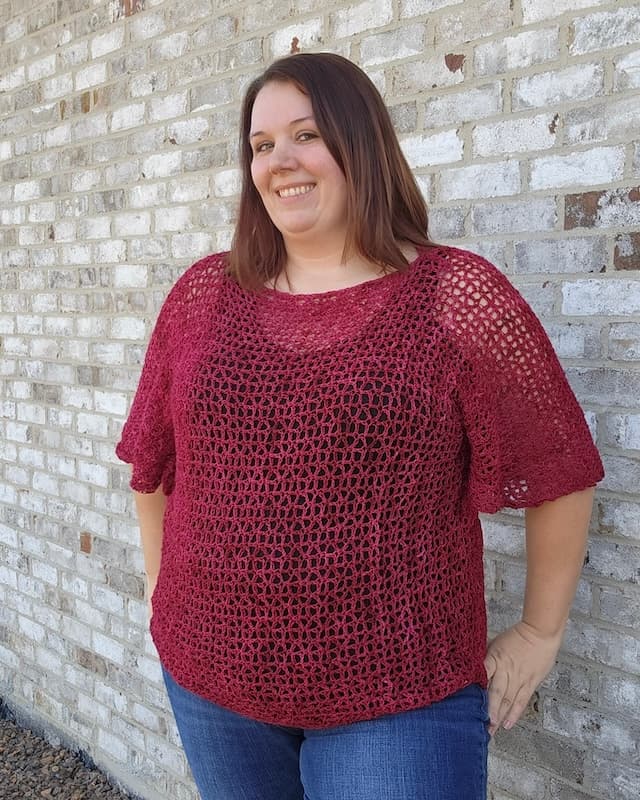
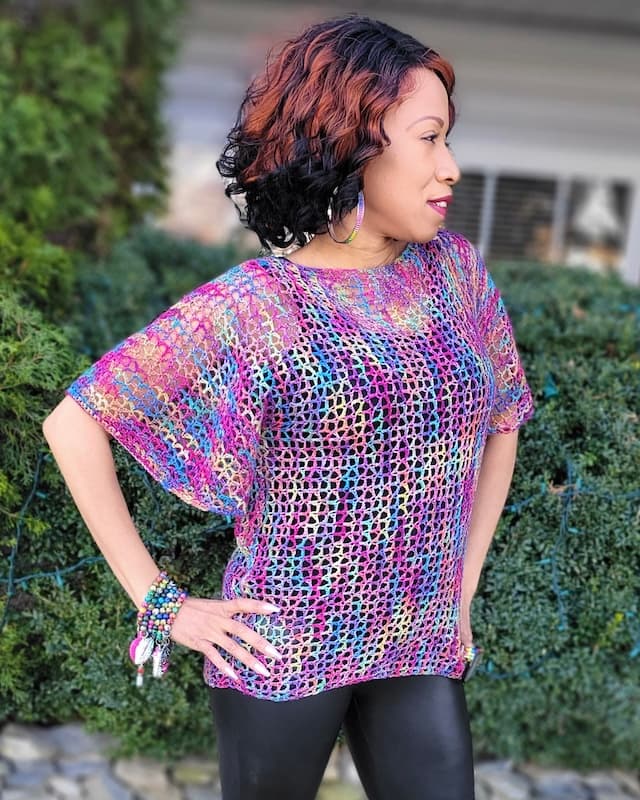
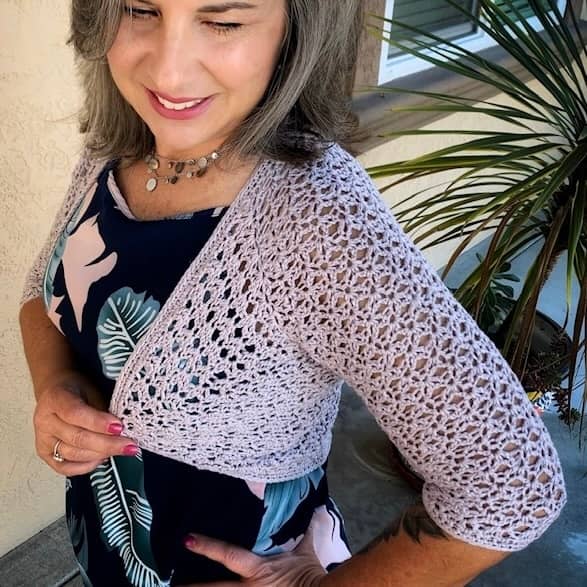
Tester Examples:
Like this pattern? Checkout these other free patterns here on the blog:
2 Comments